Short Code List
The Short Code List tab allows you to manage all the short codes associated with your account. You can view the list of short codes, details on each short code, view invoices, and receipts for a short code, and take actions on a short code such as renewal and payment.
To open this page,
- From the left-side navigation menu, click My Short Codes.
- You are redirected to the Short Code List tab by default. If you are not on this page, click the Short Code List tab.
- The list displays:
- Short Code: the short code(s) leased by your account
- Expiration Date: the expiration date of the short code lease
- Status: the status of the short code, e.g., Approved, Pending Renew, Cancelled
- Term: the term of the short code lease. For example, 3-Month, 6-Month, 12-Month, or Billed Monthly
- Order ID: the order number associated with the code lease. Clicking the order number will navigate you to the View Orders tab under the Billing page
- Auto-Renew: indicates if the code is enrolled in Auto-Renew e.g., Enrolled or Not Enrolled
- Action: indicates if any further action could be done for the short code such as Renew, or View/Pay Invoice
Click on the following links to see more details of several functions that can be done from this page.
Cancel Short Code LeaseCancel Short Code Lease
- From the Short Code List tab, expand the short code by clicking the + icon for the short code for which you wish to cancel
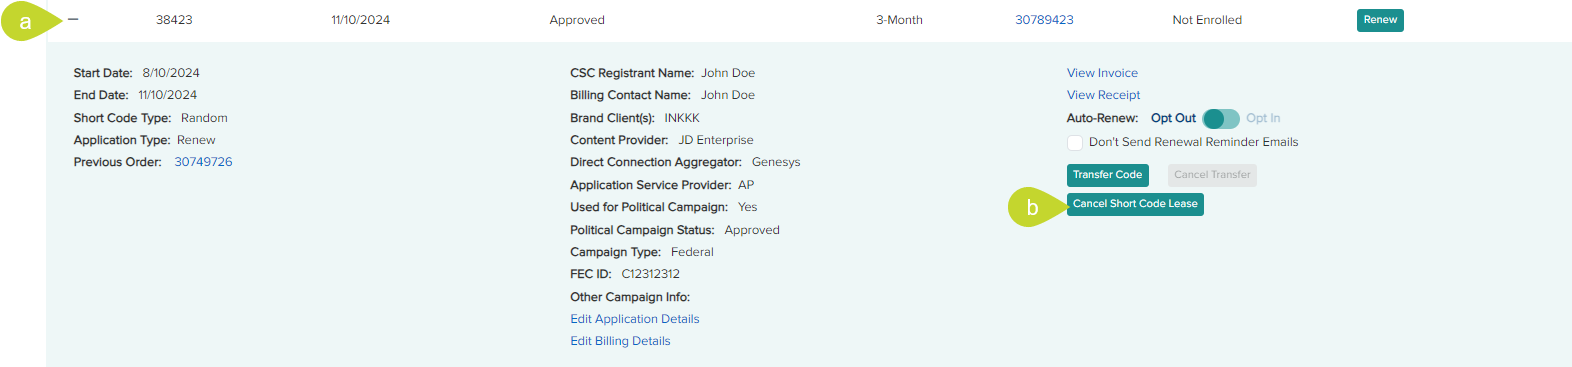
- Click the Cancel Short Code Lease button.
Note: The Cancel Short Code lease button is displayed for the leases eligible to be cancelled. The button is not displayed for Billed Monthly short codes as they cannot be cancelled.
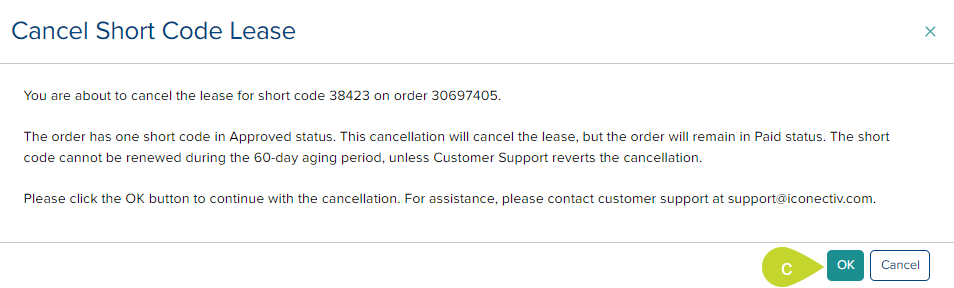
- On the Cancel Short Code Lease dialog, click OK.
Note: The condition for cancellation of short codes vary depending on the lease status.
- For a Pending New lease, the short code(s) are returned to the available pool and are no longer on the short code list.
- For a Pending Renew or Approved lease, the short code is cancelled and starts aging for 60 days
- If the lease status is already Cancelled by the system, it can be re-cancelled to prevent the short code being renewed or paid for. Aging continues from the date it was cancelled by the system.
- The short code cannot be renewed duirng the 60-day aging period unless you request Customer Support to revert the cancellation.
Download Transfer StatementDownload Transfer Statement
This link is only applicable for the short codes that are transferred from another account.
- From the Short Code List tab, expand the short code by clicking the + icon for the short code for which you wish to print or download the invoice.
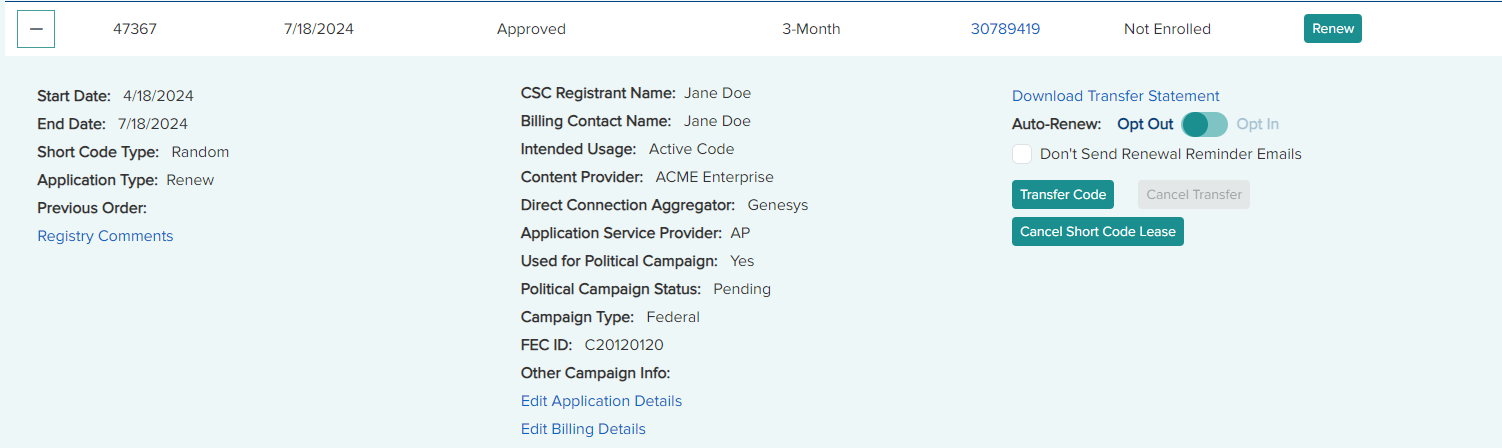
- Click the Download Transfer Statement link to download the statement in PDF format.
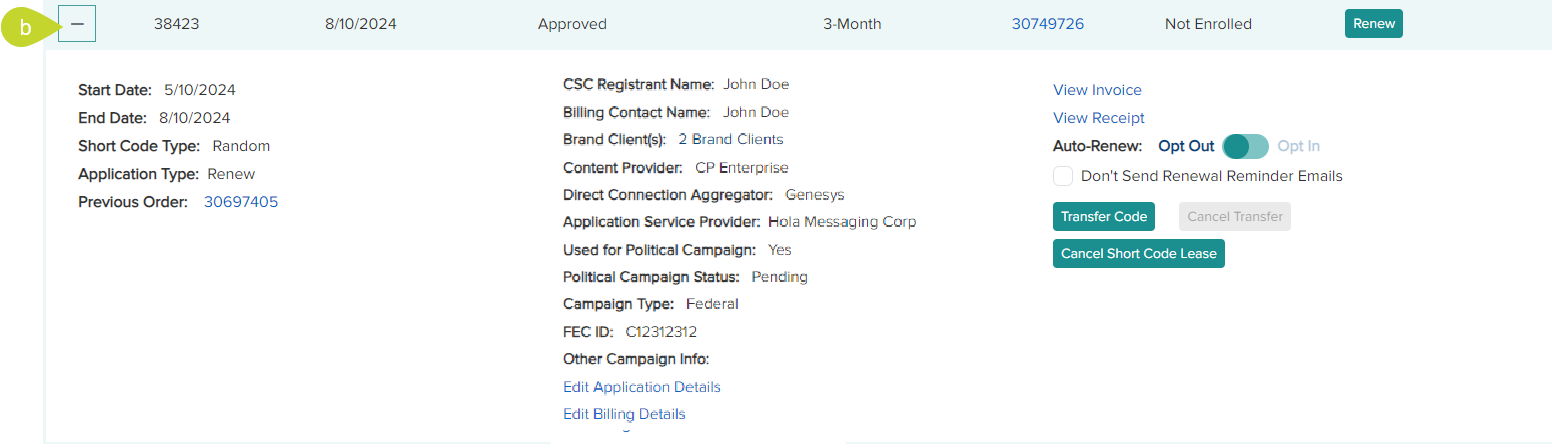
Edit Application DetailsEdit Application Details
- From the Short Code List tab , expand the short code by clicking the + icon for the short code for which you wish to edit the application details.

- Click the Edit Application Details link to open the Edit Application: <#####> in a new tab.
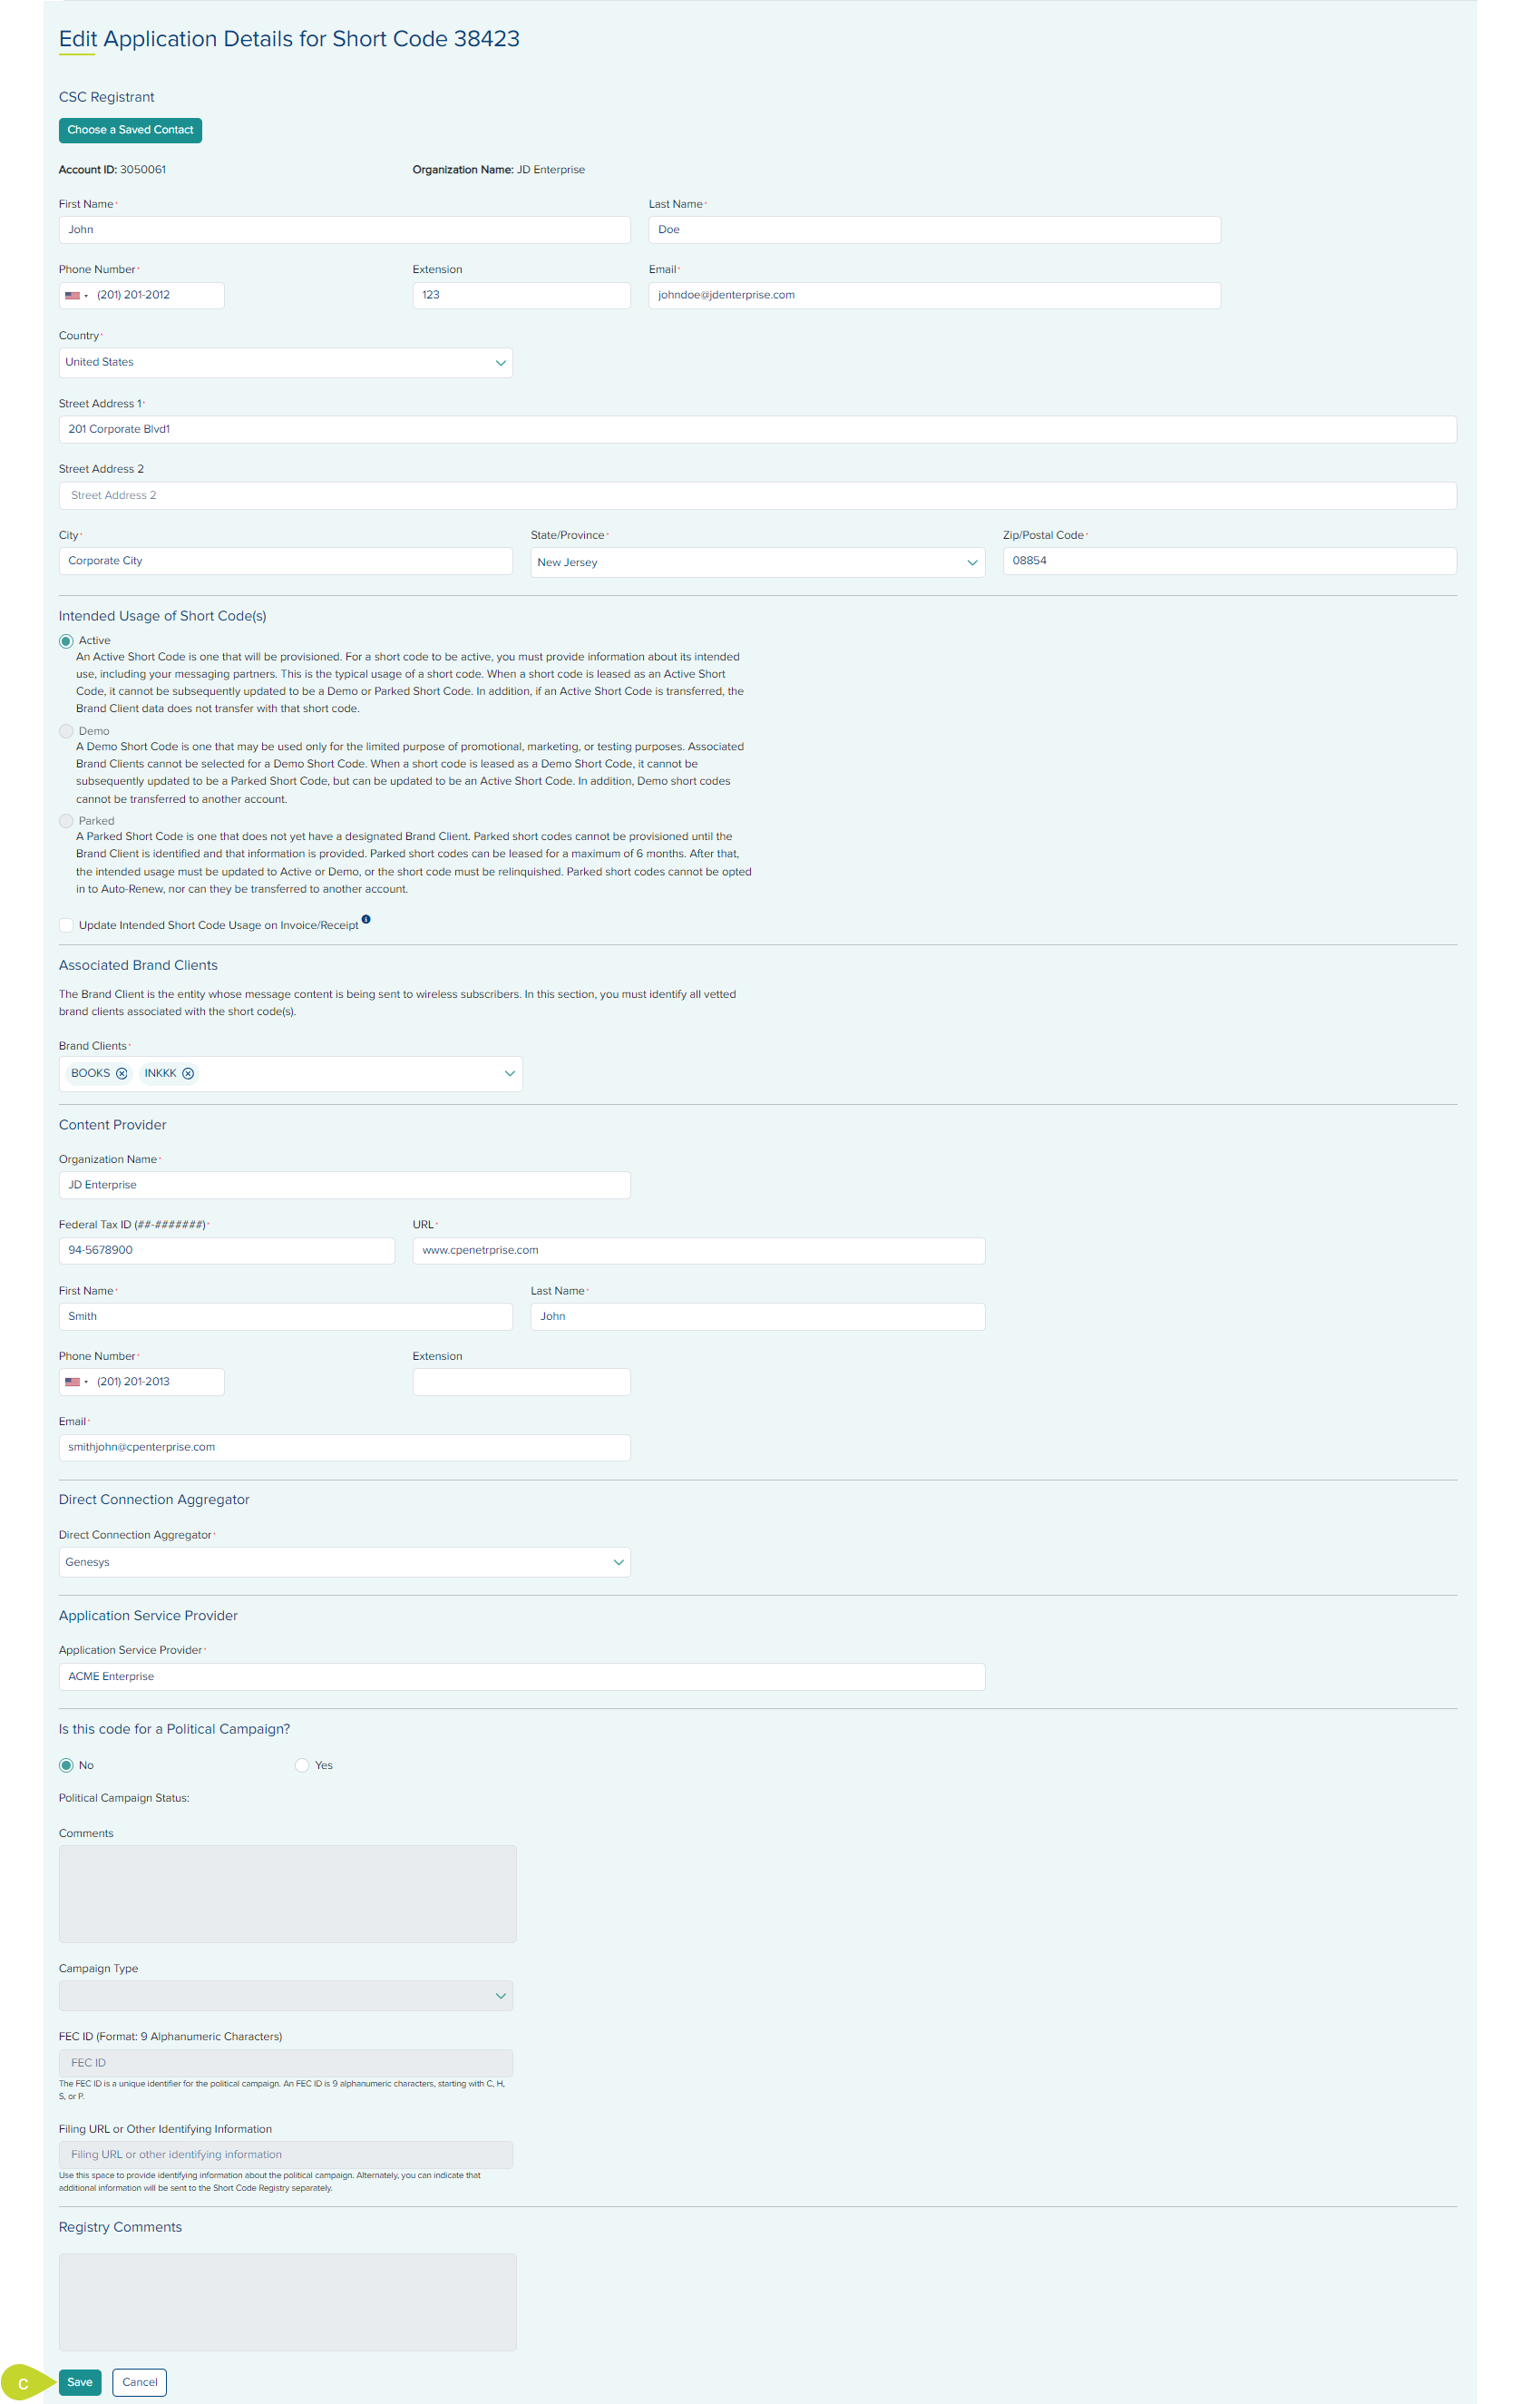
- Make the necessary updates and click Save.
Edit Billing DetailsEdit Billing Details
- From the Short Code List tab , expand the short code by clicking the + icon for the short code for which you wish to edit the application details.
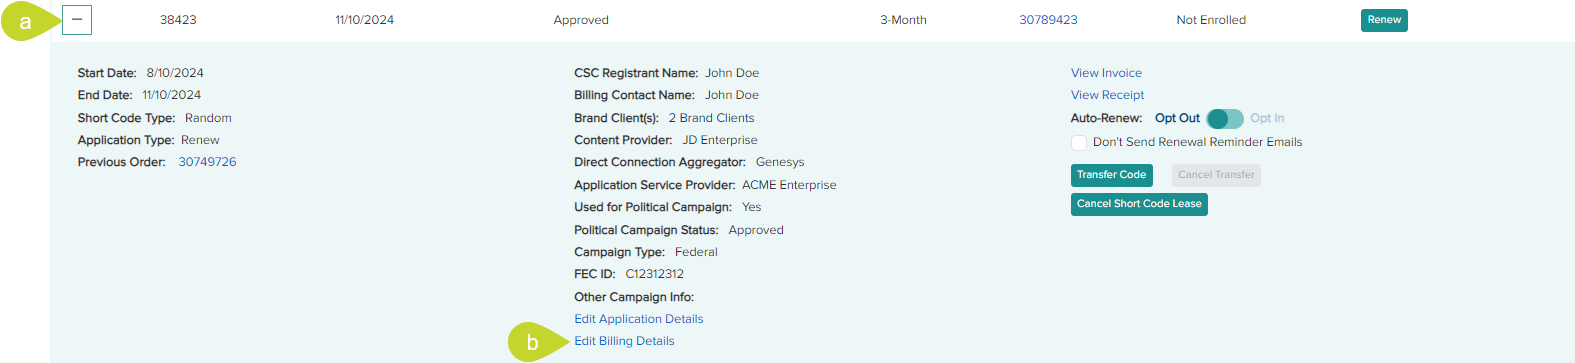
- Click the Edit Billing Details link to open the Edit Billing: <#####> in a new tab.
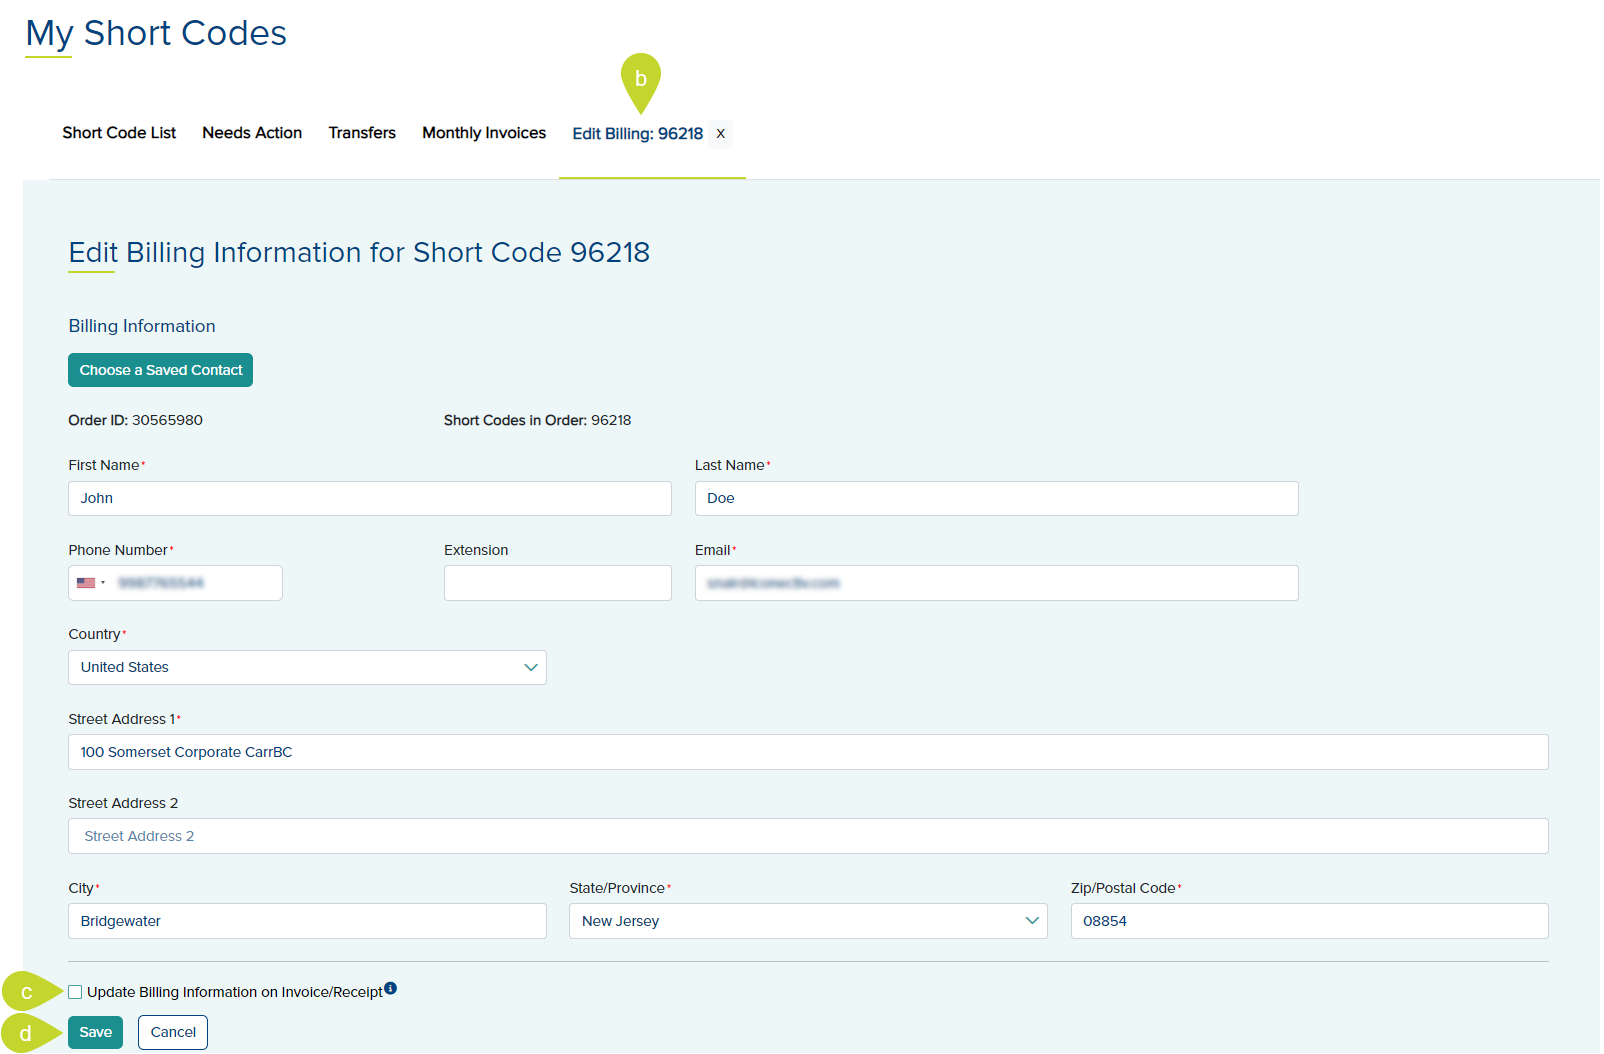
- Check the option Update Billing Information on Invoice/Receipt if you wish to reflect these changes on the invoice and receipt.
- Make the necessary updates and click Save.
Initiate transfer of an approved code Initiate transfer of an approved code
- From the
Short Code List tab, expand the short code by clicking the + icon for the short code for which you wish to initiate the transfer.
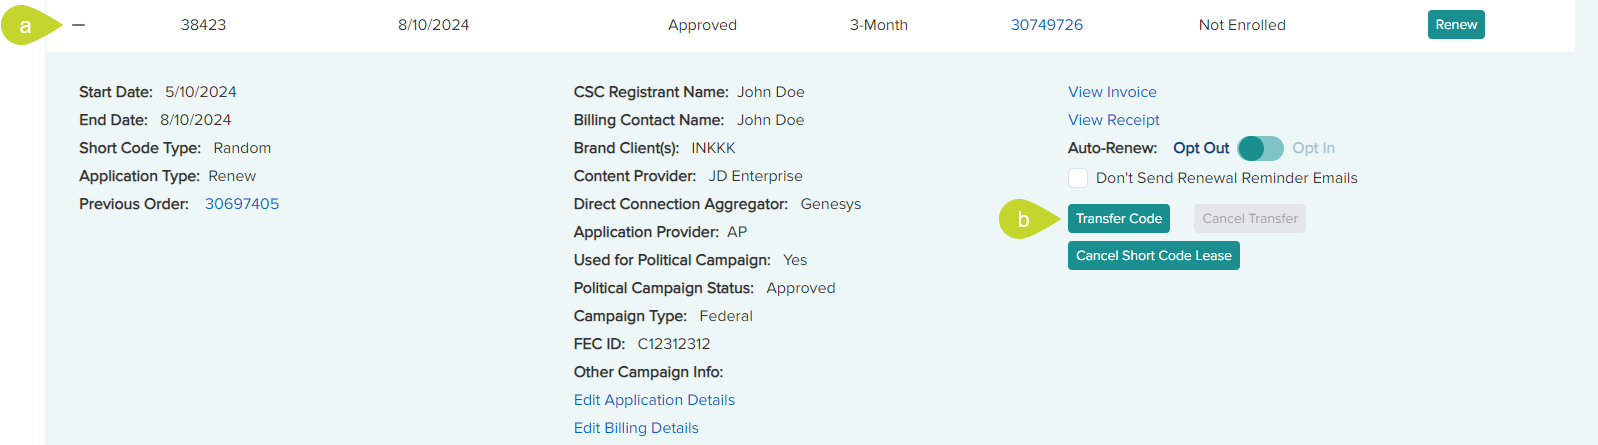
- Click the Transfer Code button.
- In the
Transfer a Short Code dialog, enter the receiver's account number in the
To Account ID field.
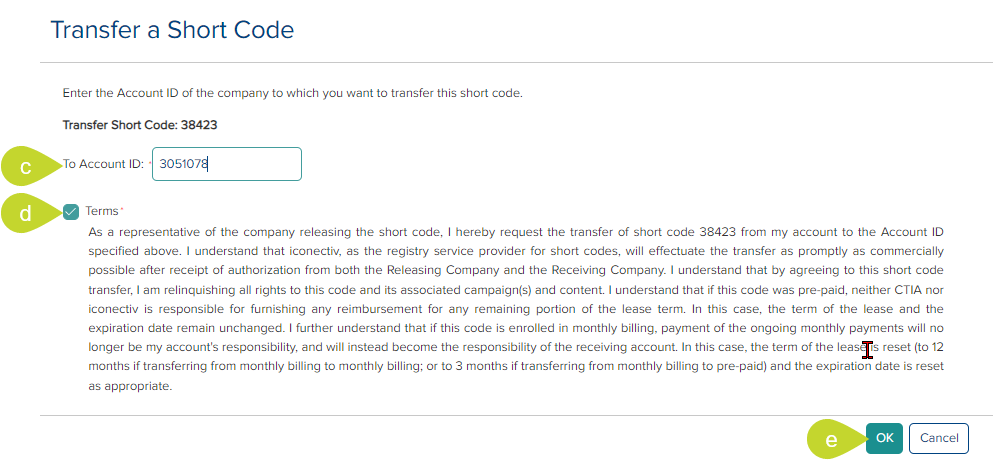
- Read and agree to the Terms by clicking the check-box.
- Click the Transfer Code button.
- The code is transferred and is in the status
Transfer
Pending. In case of an invalid entry or selection, an error message is displayed.
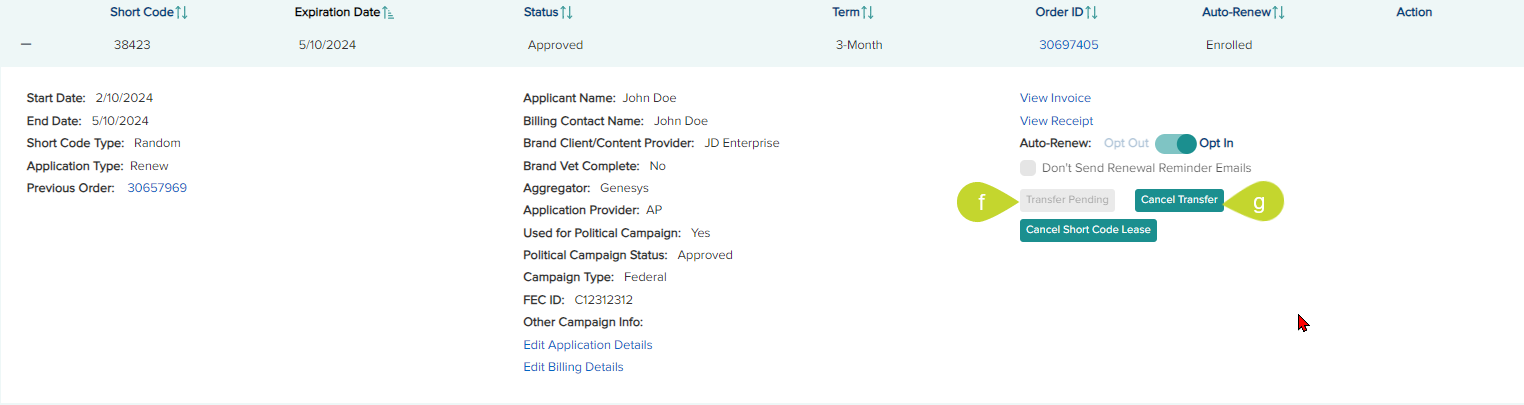
- If you wish to cancel a transferred code that is not yet accepted by the receiver, you can click the Cancel Transfer button.
- In the
Cancel Transfer dialog, click
Yes to proceed.

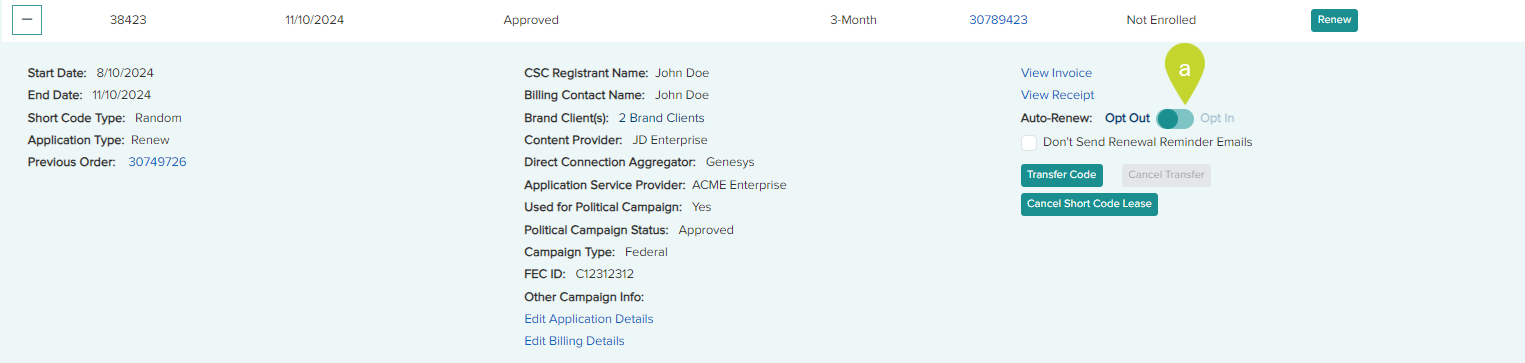
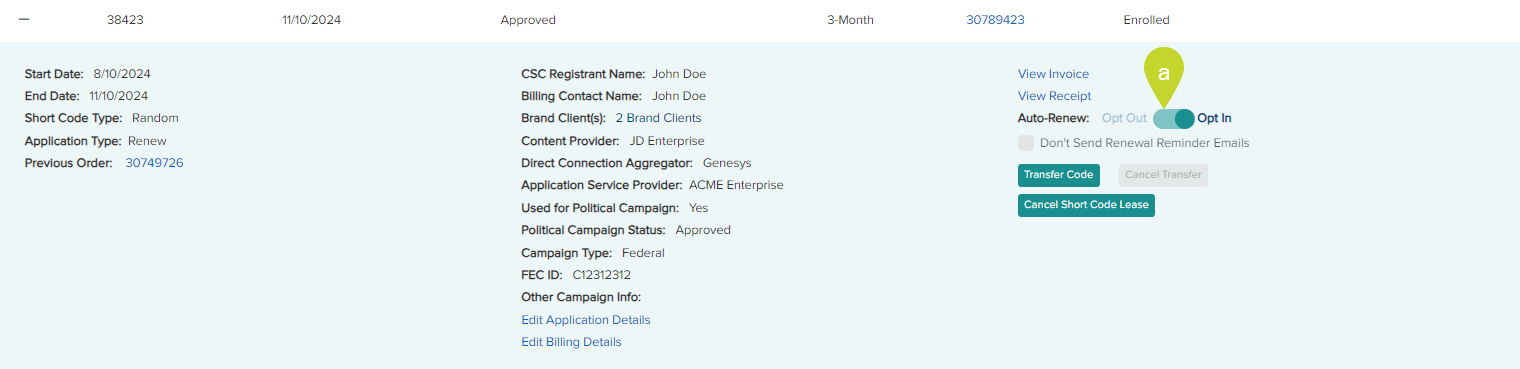
Opt In/Out of Auto-RenewOpt In/Out of Auto-Renew
From the Short Code List tab, expand the short code by clicking the + icon for the short code for which you wish to view.
Opt In:
A user can Opt In to auto-renew on a prepay lease (excluding the 1-month lease) at any time when the lease status is
Approved,
Pending New or
Pending Renew but not
Cancelled.
Note: If the
lease status is Approved and the expiration is within 5 days, the short code is scheduled to automatically renew tonight.
- For a code that is not enrolled in auto-renew, click the
Auto Renew: Opt Out toggle to the right.
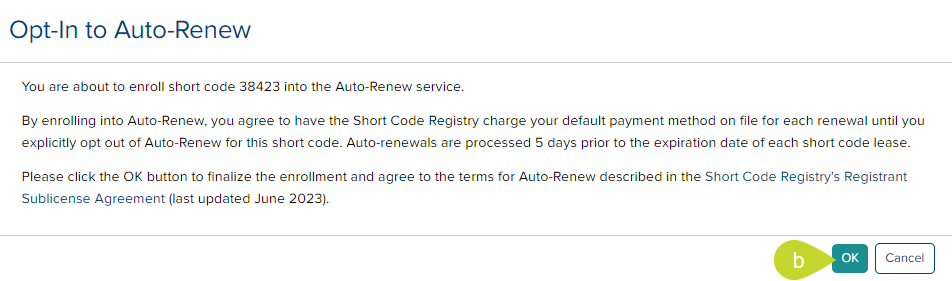
- In the
Opt In to Auto-Renew
dialog, click
Confirm.
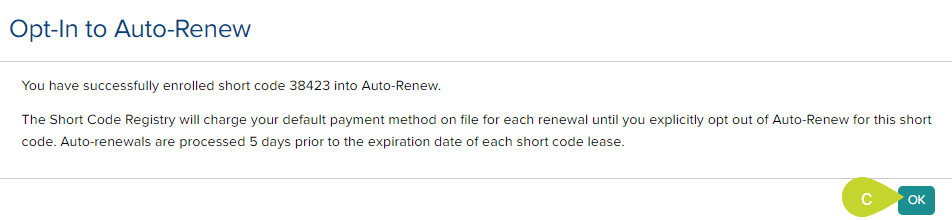
- A success dialog appears, click
OK.
Opt Out:
- For a code that is enrolled in auto-renew, click the
Auto Renew: Opt In toggle to the left.

- In the
Opt In to Auto-Renew
dialog, click
Confirm.
- A success dialog appears, click
OK.

From the Short Code List tab, expand the short code by clicking the + icon for the short code for which you wish to view.
Note that this option is only available for the short codes that are enrolled in monthly billing.
- For a code enrolled in Monthly Billing, click the Opt Out of Monthly Billing button.

- In the Opt Out of Monthly Billing dialog, if you wish to cancel the selected code immediately after the completion of opting out, select the check box Cancel the short code immediately after the opt out completes.
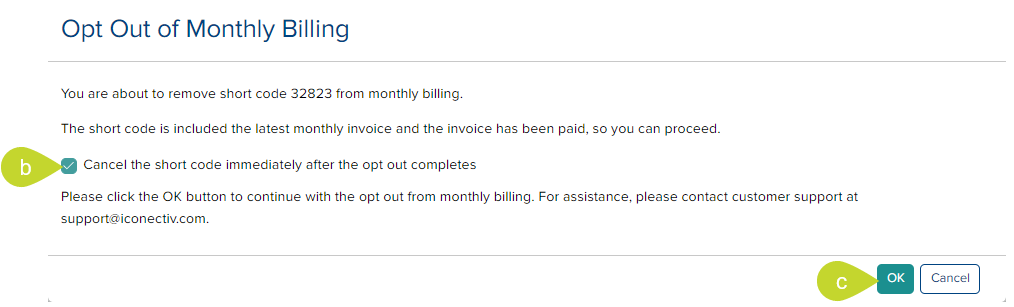
- Click OK. A success message is displayed with the expiry date of the selected short code.
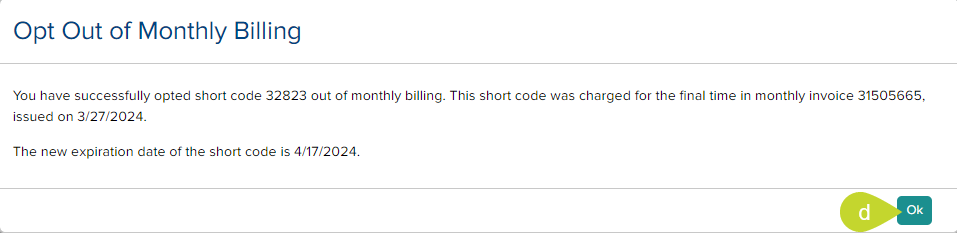
- Click OK. If the cancel option was not selected, the status will indicate Approved (MB Opt Out). If the cancel option was selected, the status will be changed to Cancelled (Cancel Requested). If the cancel needs to be reverted, you can contact customer support.
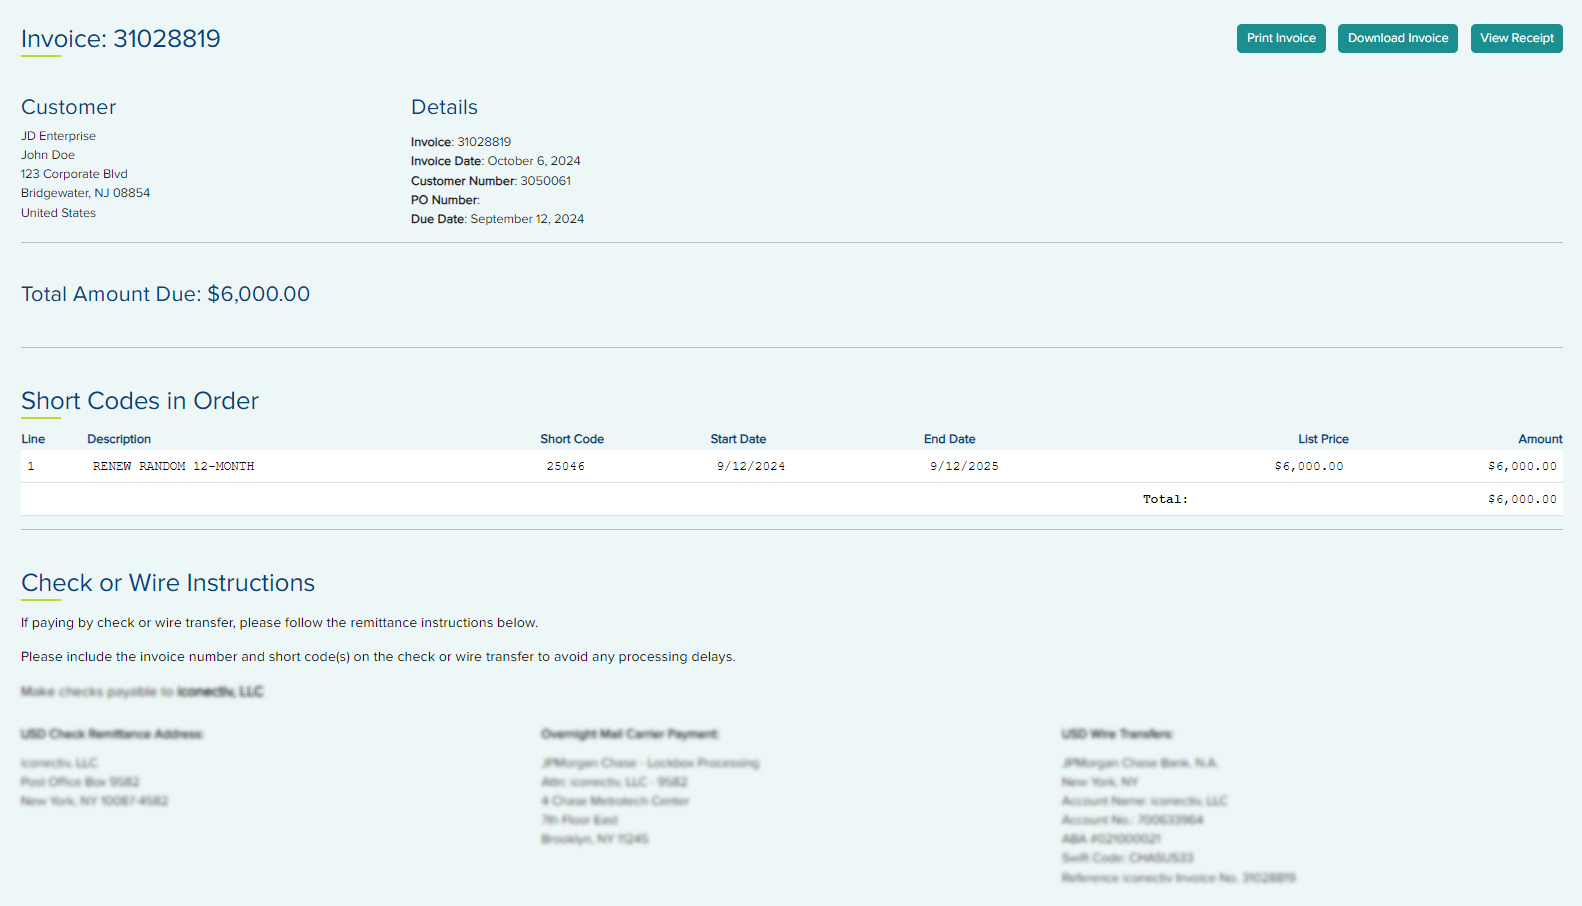
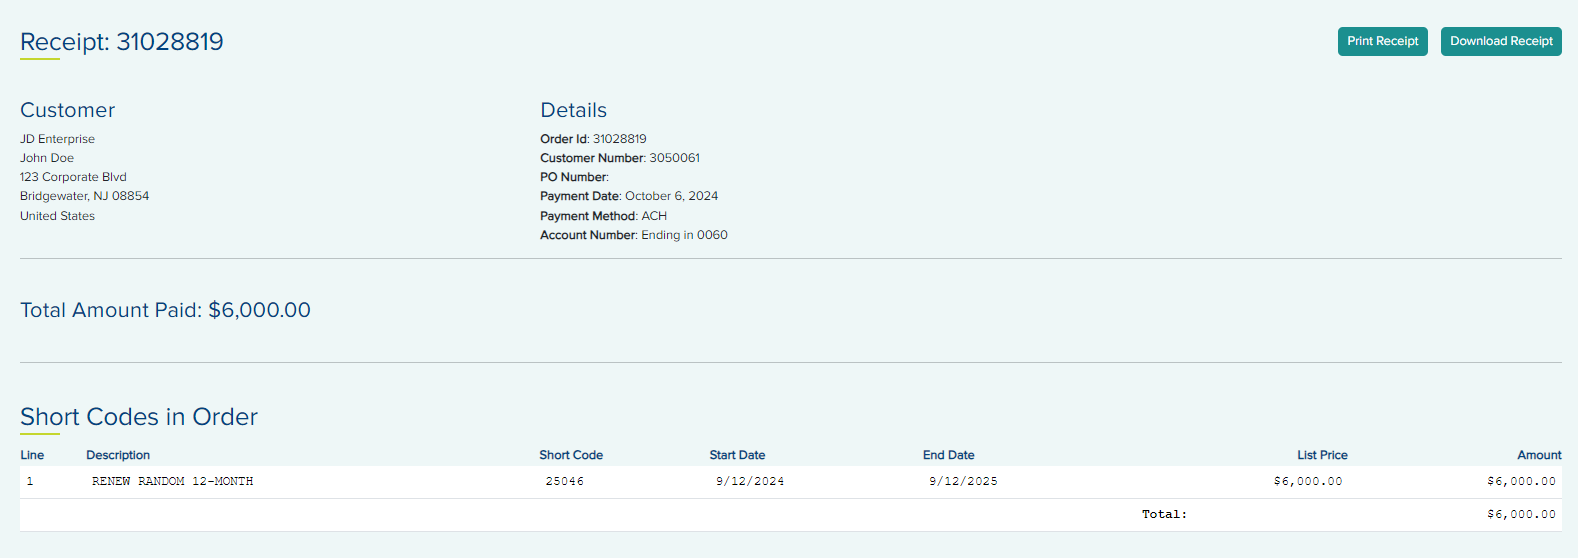
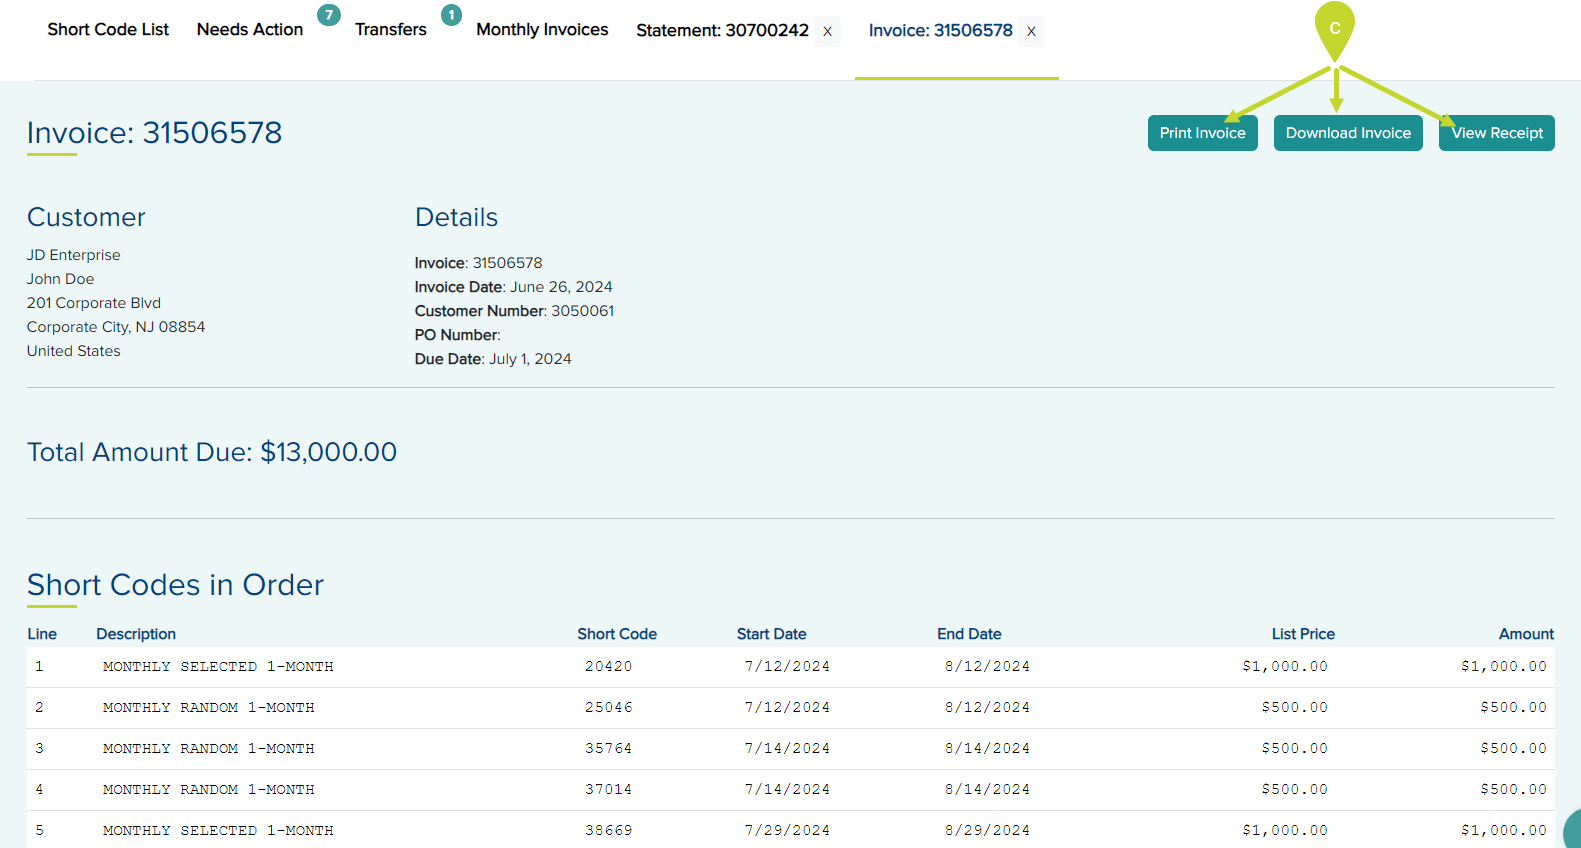
Print/Download Invoice/View ReceiptPrint/Download Invoice/View Receipt
- From the
Short Code List tab, expand the short code by clicking the + icon for the short code for which you wish to print or download the invoice.
- Click the View Invoice link to open the invoice of the selected code in a new tab.
- In the opened Invoice, click the
Print Invoice button to print the invoice.
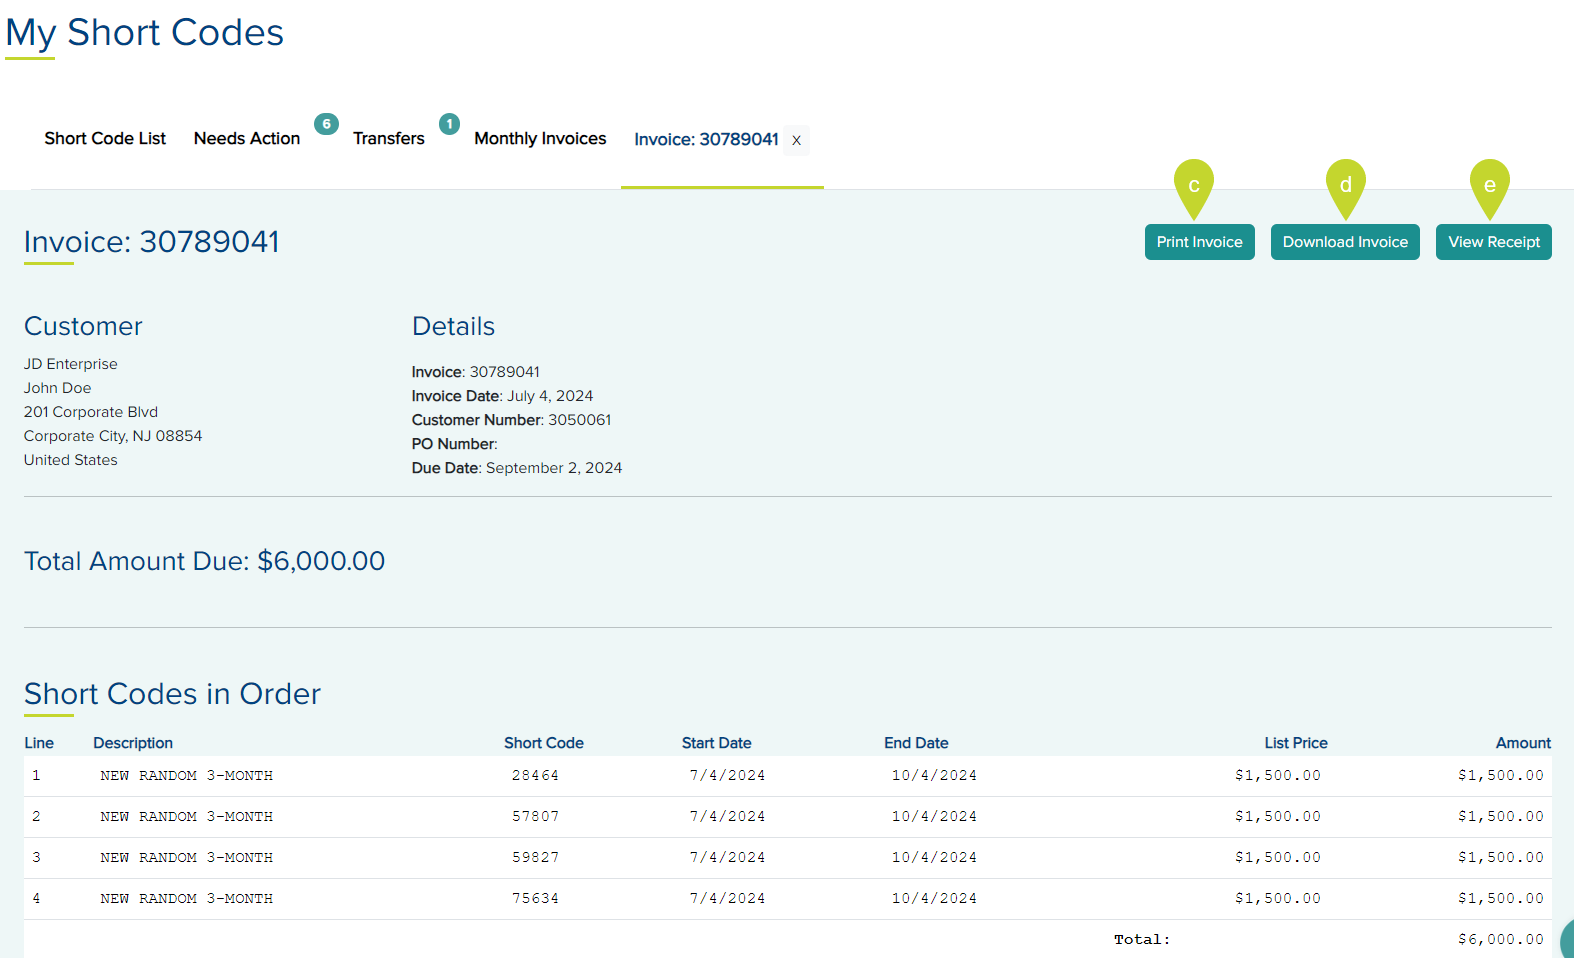
- In the opened Invoice, click the Download Invoice button to download the invoice as a PDF.
- To view the receipt, click the View Receipt button.
Renew Short Code ManuallyRenew Short Code Manually
Manually renewing a short code is a lot like ordering a new short code. The Renew button will always be displayed for short codes on the Short Code List as long as those short codes are not enrolled in Auto-Renew and the invoice has been paid.
- From the Short Code List tab, click the Renew button under the Action column of the list for the short code you wish to renew.
Renew Checkout – Cart tab
- In the Renew Checkout cart, select the Term for the short code renewal lease from the drop-down.
Note: Customers that are enrolled in the Monthly Billing Program will have an additional term option apart from 3-Month, 6-Month and 12-Month available to them called Billed Monthly. The Billed Monthly option cannot be selected for expired codes.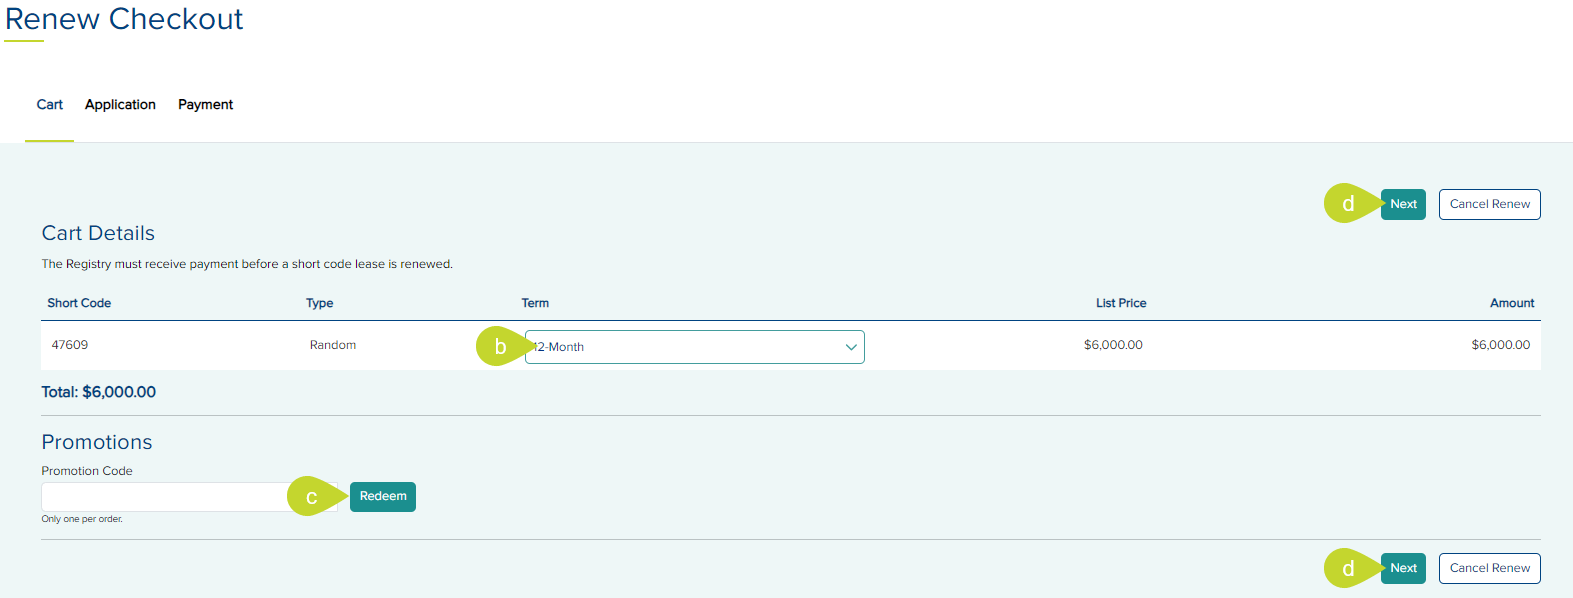
- In the Promotions section, enter a Promotion Code if you have any in the provided field and click Redeem.
- Click Next to proceed to the Application tab.
Renew Checkout – Application tab
- The information on the Application tab of the selected short code is carried over from the previous lease. You may update the application information on this tab if you wish.
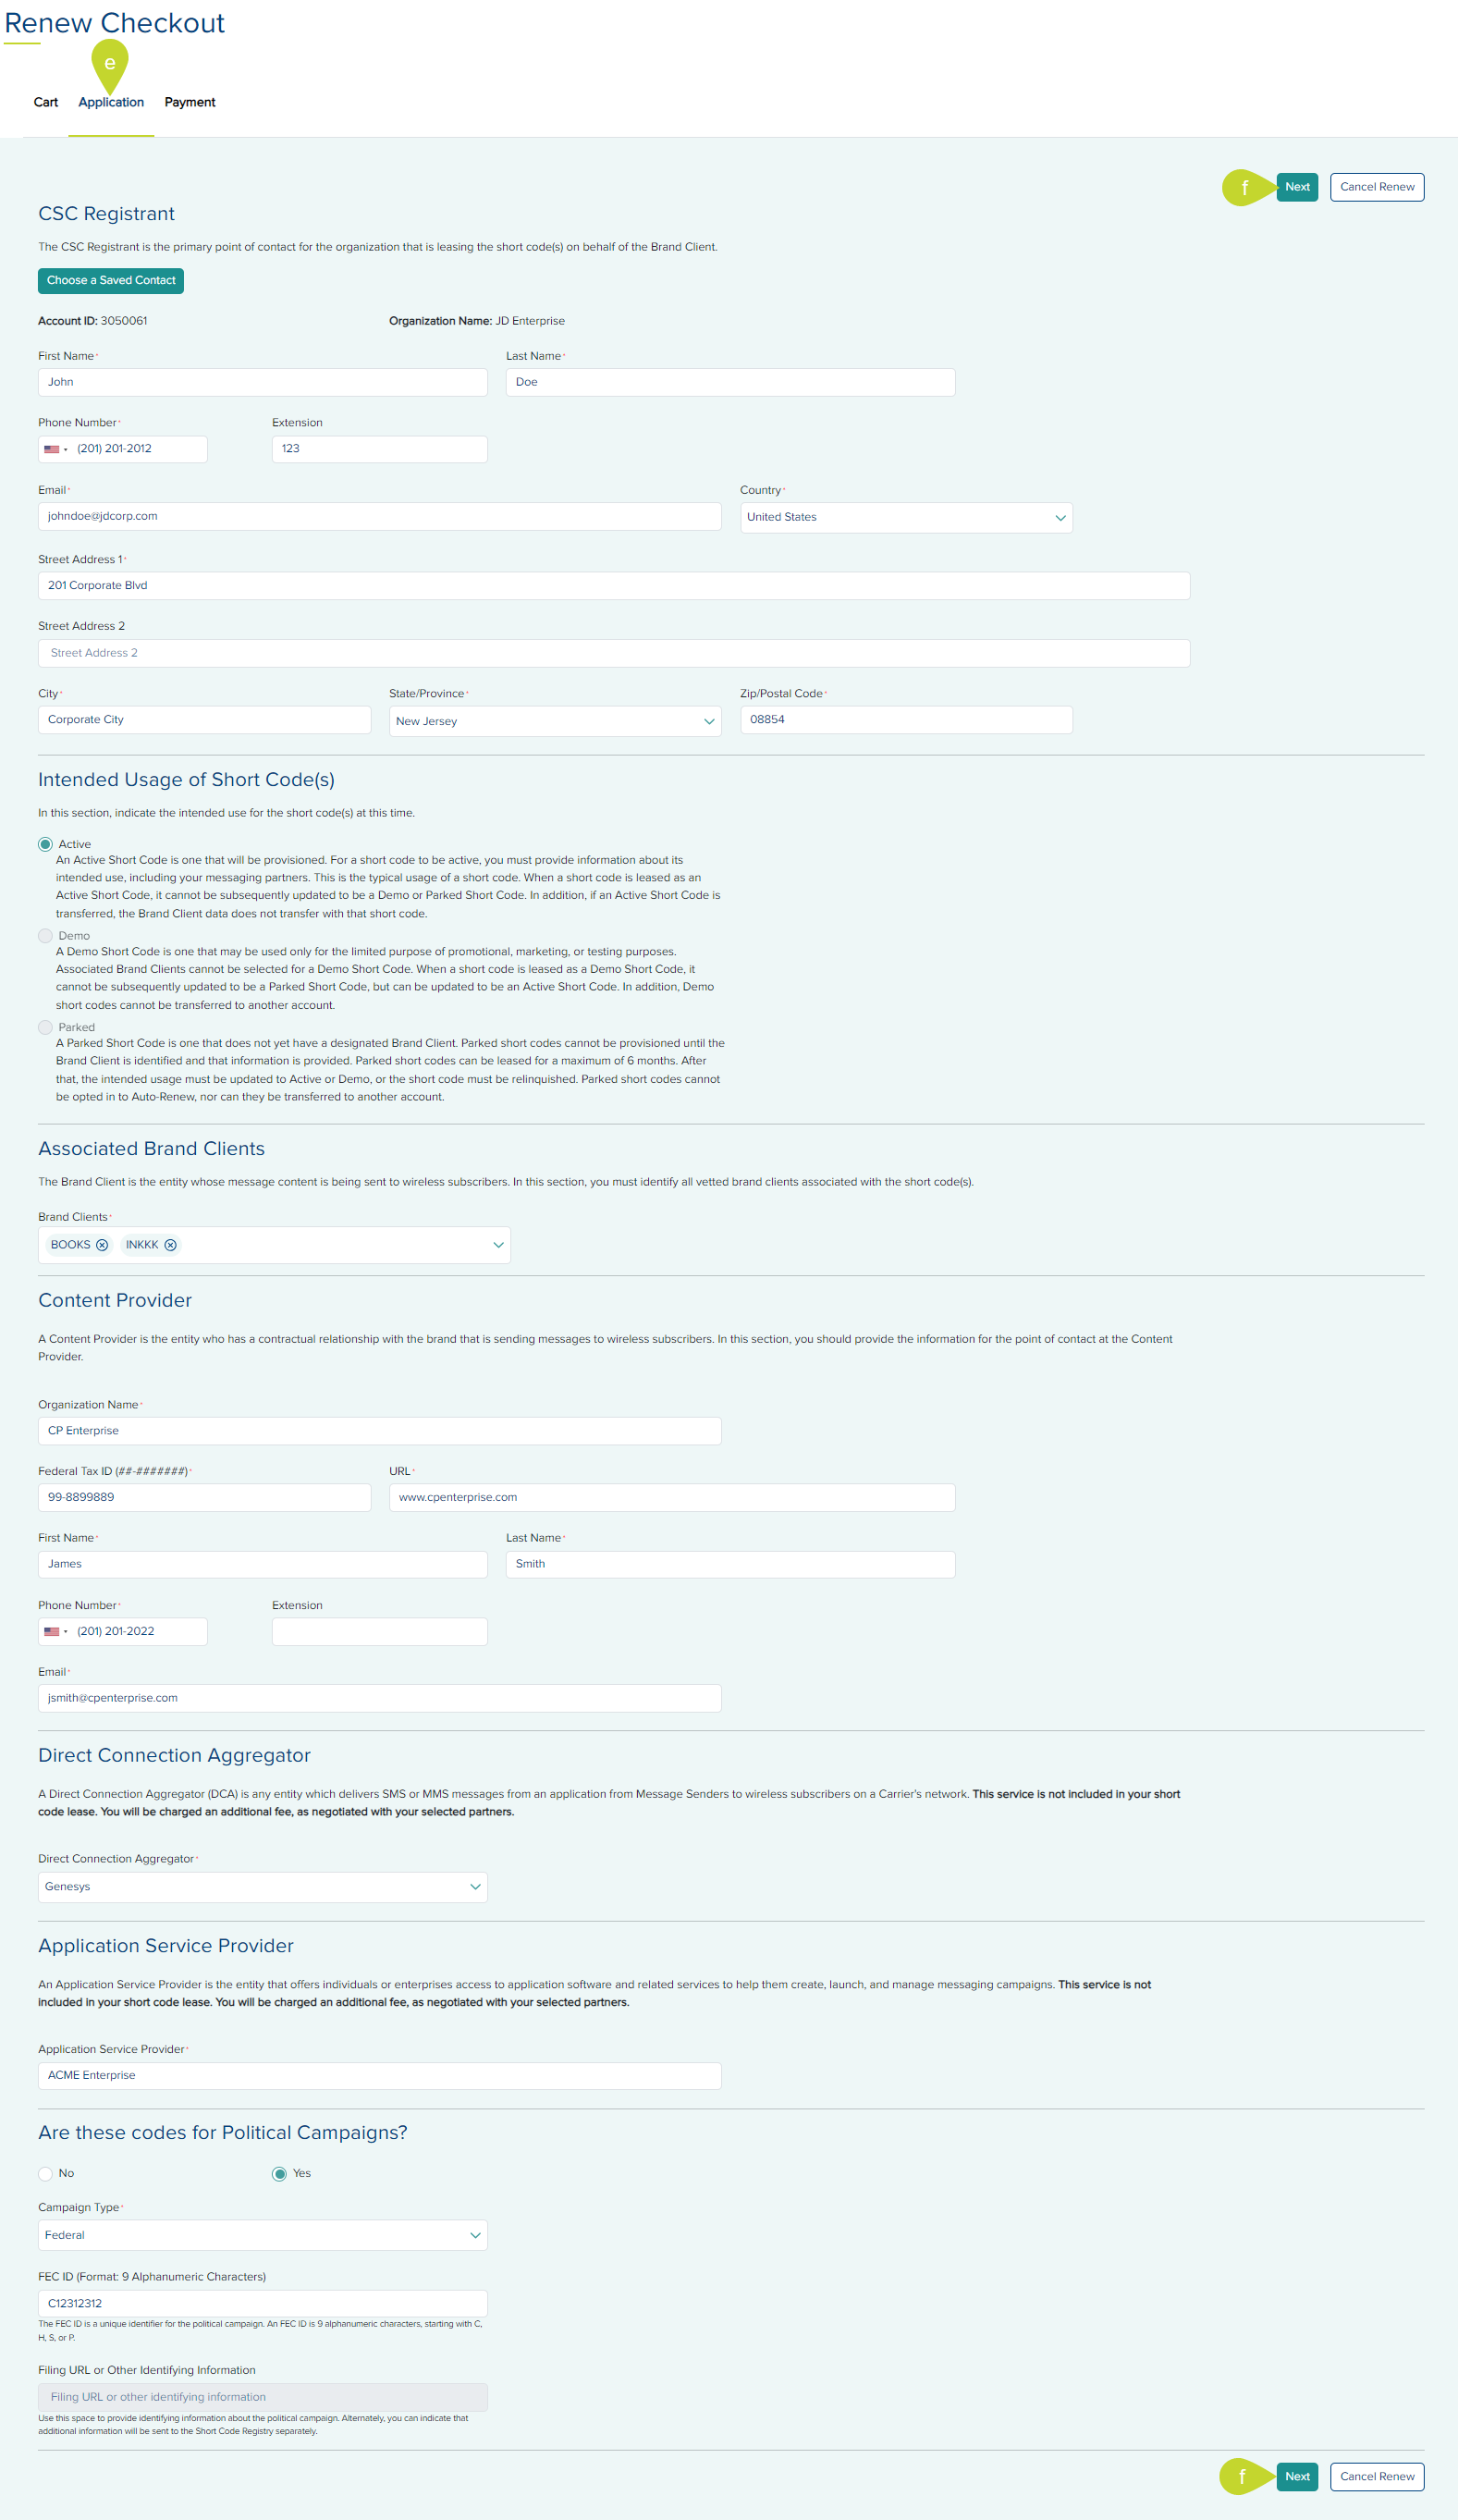
- Click Next to proceed to the Payment tab.
Renew Checkout – Payment tab
- If you wish to make the payment now, select Pay Now under the Payment Information section.
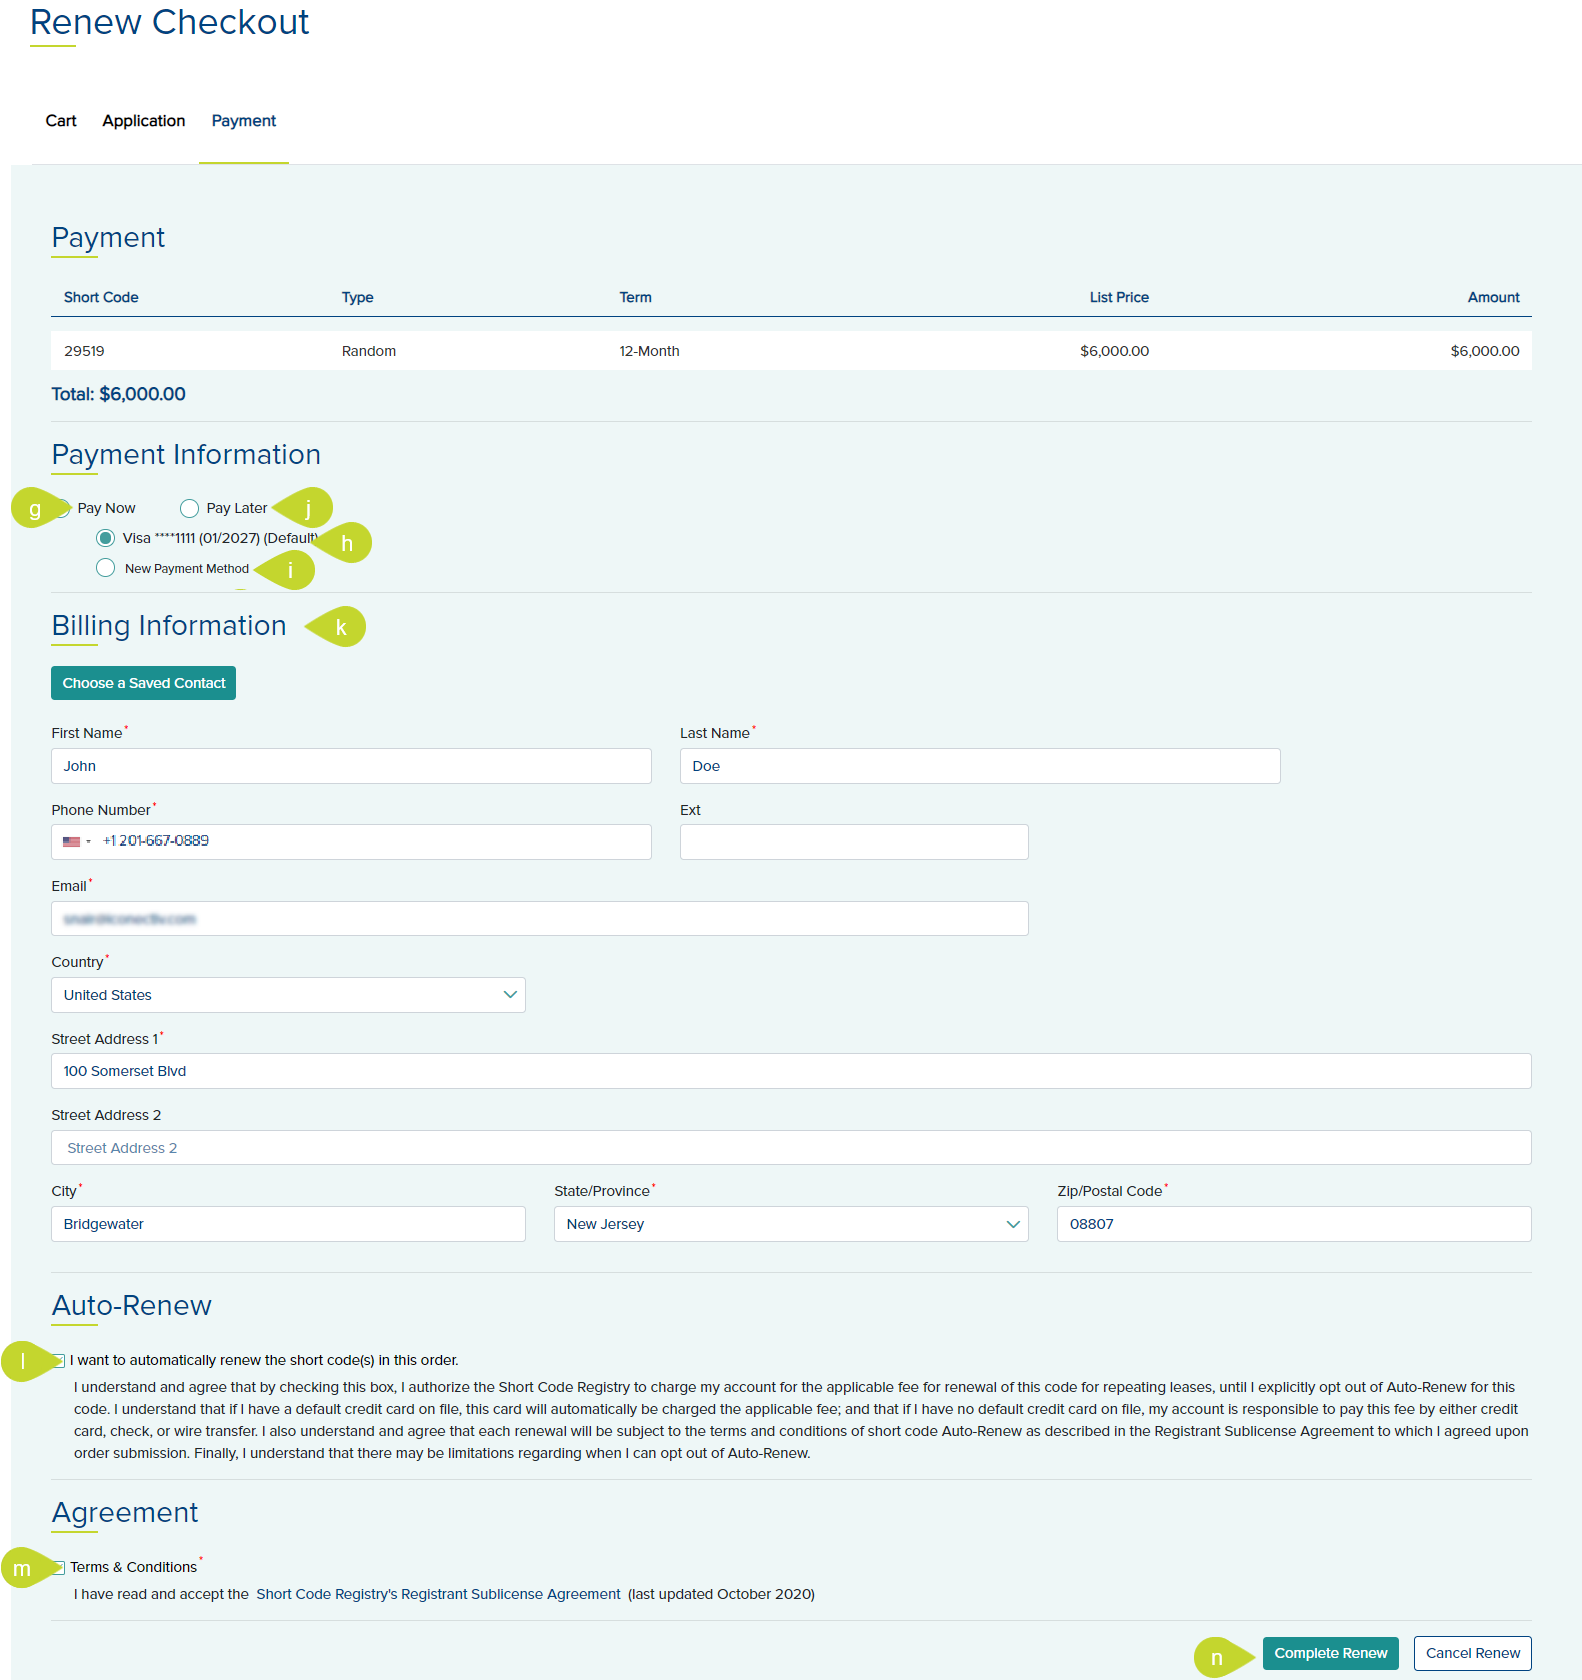
- Select one of the saved payment methods.
- If there are no existing cards or ACH in your account or if you wish to make the payment using a new credit card or ACH, click the New Payment Method option.
Note: If your account has available credit, and you wish to use this credit to pay, select the Apply Credit on Account check-box. This check box only appears when your account has available credit. - If you wish to pay for the renewal at a later date, choose Pay Later. If you choose to pay later you may not be able to continue using your code past the previous expiration date as the Carriers require a sales receipt, which is only issued when payment is complete.
- The Billing Information section displays the account's billing address. If you wish to change this to one of the saved addresses, click Choose a Saved Address button.
- If you wish to enroll this short code into auto-renew, accept the terms and conditions by clicking the check box below the Auto-Renew section.
- In the Agreement section, select the Terms and Conditions check box.
- Click Complete Renew to finish the order or click Clear Renew to cancel the order. Once the order is completed, a Thank You page is displayed.
Search for a Short CodeSearch for a Short Code
To search for a code on the Short Code List tab,
- Move the toggle is towards the
Short Code.

- Enter the short code in the provided search field above the list. This is a dynamic search and filters as you enter the characters.
Search for an Order IDSearch for an Order ID
To search for an Order ID on the Short Code List tab,
- Move the toggle is towards the
Order ID.

- Enter the Order ID in the provided search field above the list. This is a dynamic search and filters as you enter the characters.
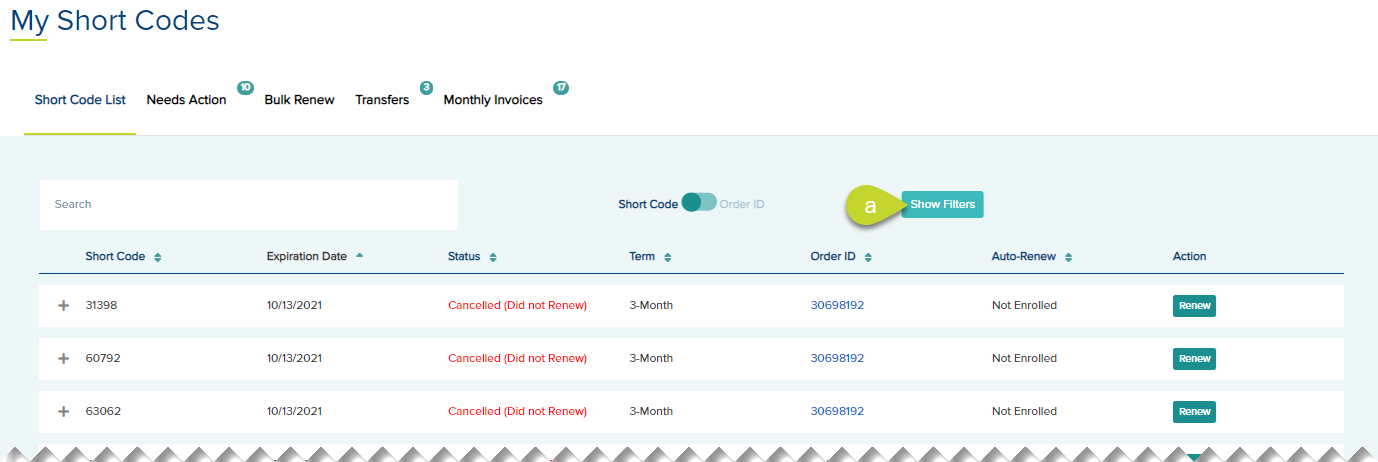
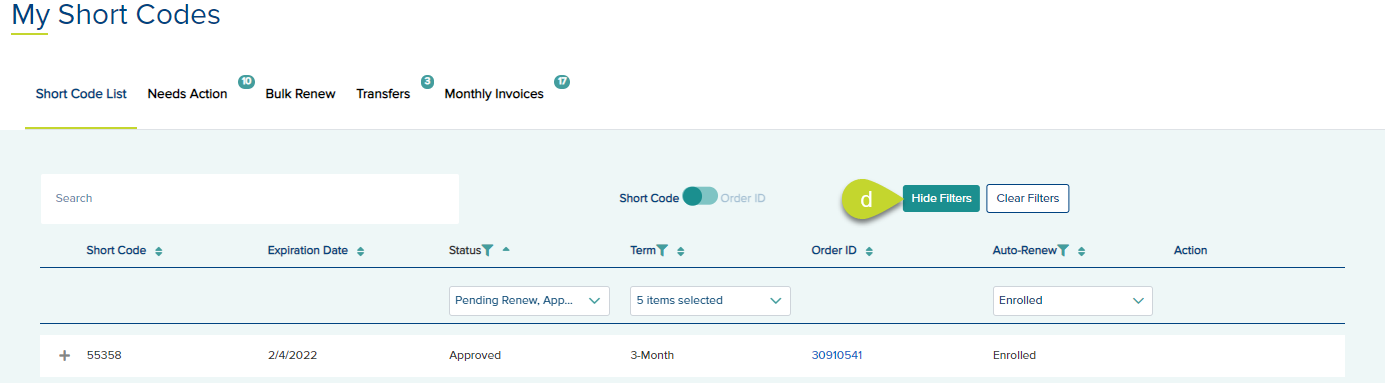
Show/Hide/Clear Filters Show/Hide/Clear Filters
The Short Code List supports filtering by data values in key columns.
- To display the filters, on the
Short Code List tab, click the
Show Filters button on top of the list. This button is only displayed if the filters are hidden.
- To apply the filters, select the filter for
Status,
Term,
and/or
Auto-Renew columns. The list is filtered depending on your selection.
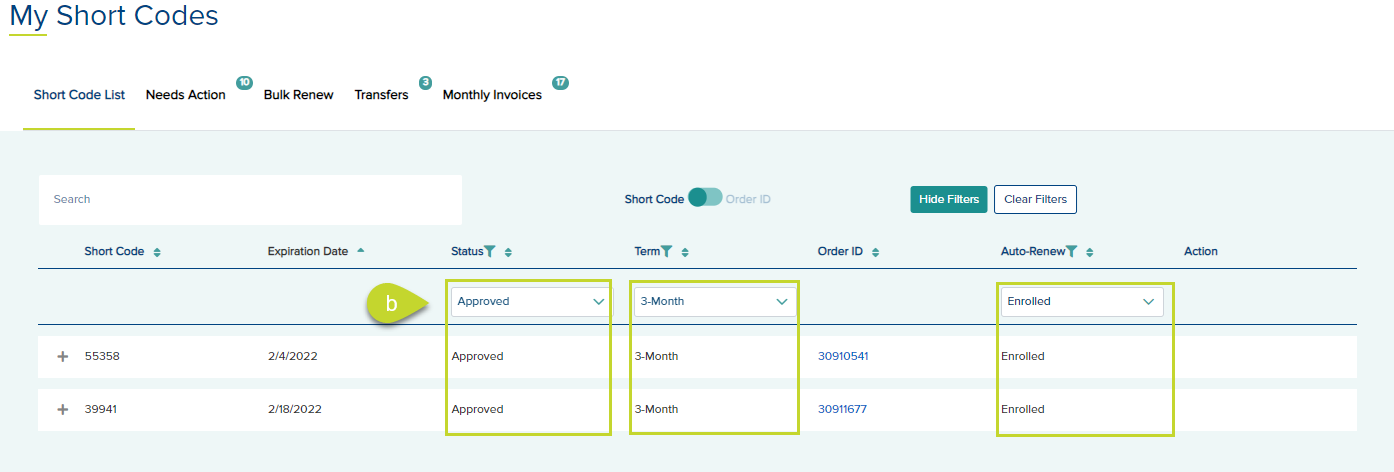
Note that you can multi-select the filters.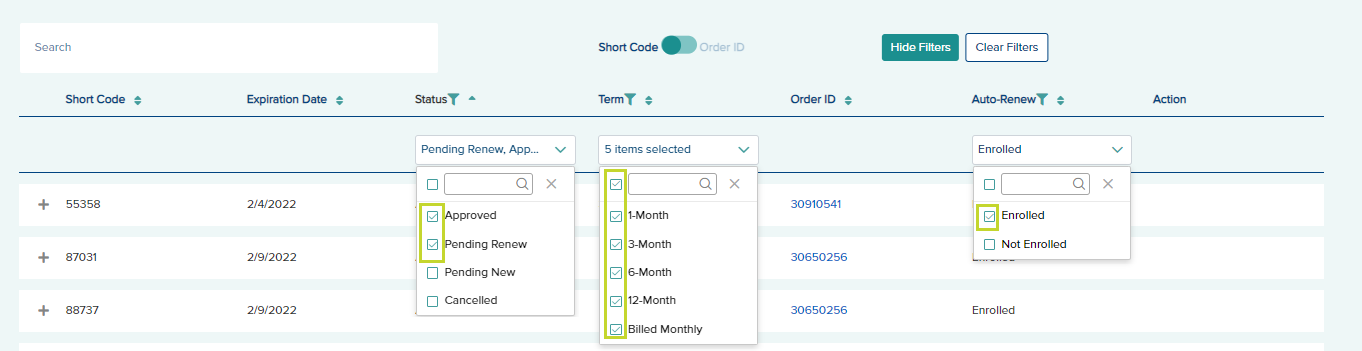
- To clear the filters, click the
Clear Filters button on top of the list. This button is only displayed if the filters are shown.
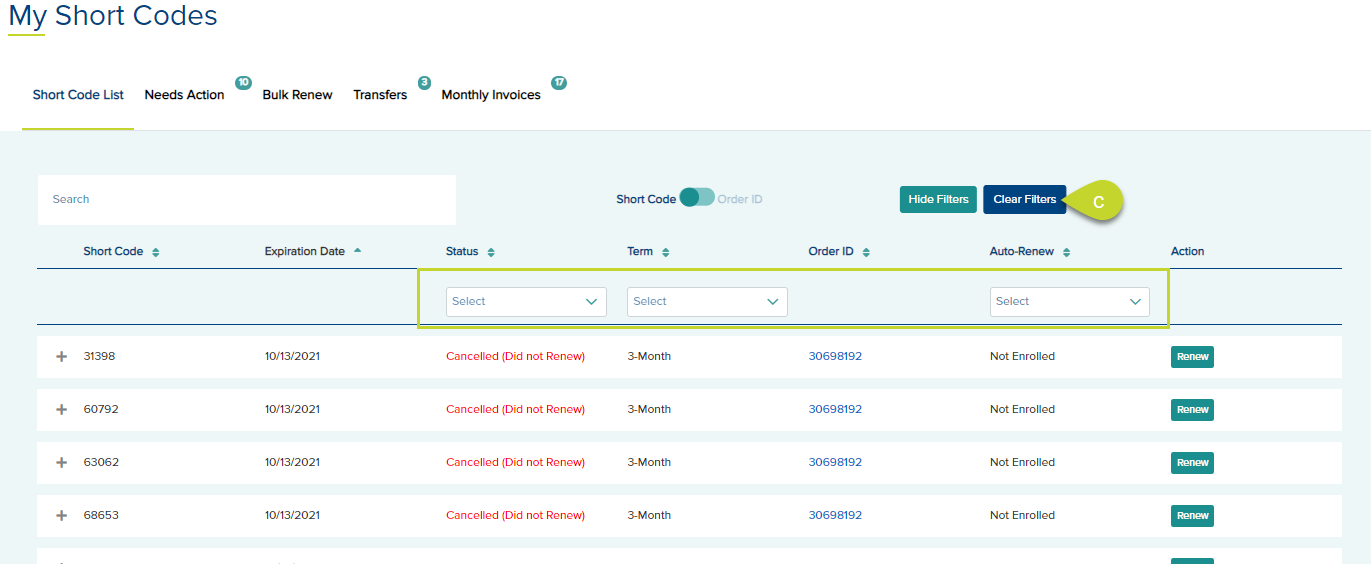
- To hide the filters, click the
Hide Filter button on top of the list.
Note: If you hide the filters without clearing, the filters remain applied to the list.
Stop receiving renewal emailsStop receiving renewal emails
- From the
Short Code List tab, expand the short code by clicking the + icon for the short code for which you wish to stop receiving renewal emails.
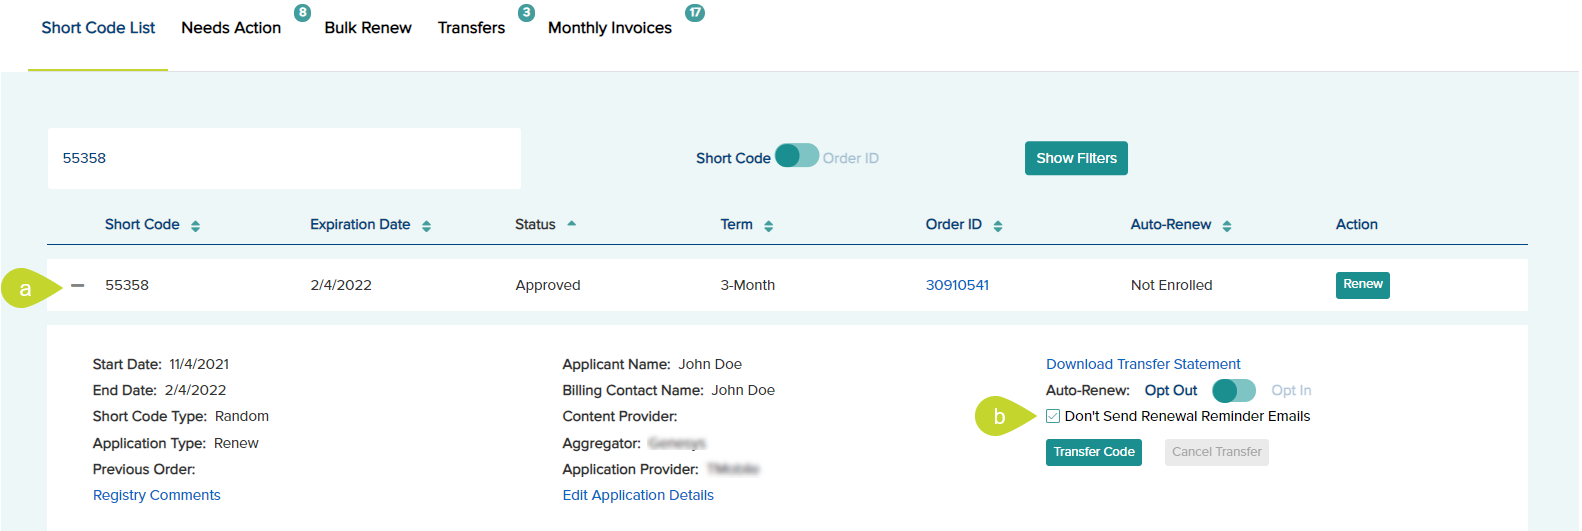
- Check the option Don't Send Renewal Reminder Emails
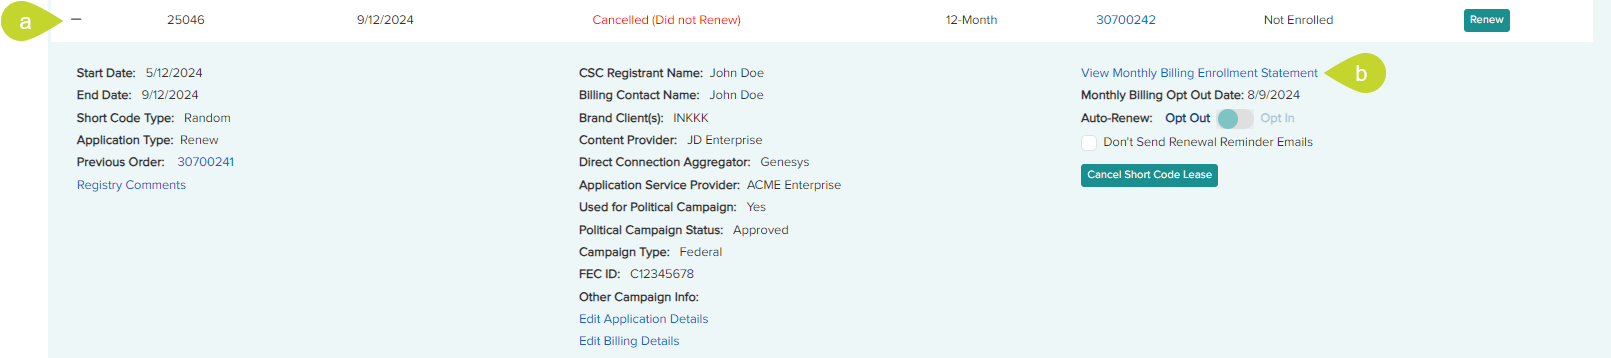
View/Hide Short Code DetailsView/Hide Short Code Details
- To expand the details about a short code, you can click the “+” icon next to the short code. This expands the short code row in the table to display details about the short code and additional actions, such as Edit Application Details, View Invoice/Receipt,
initiate short code transfers, and Opt In/out of Auto-Renew.

- To collapse the short code details, you can click the “-” icon next to the short code
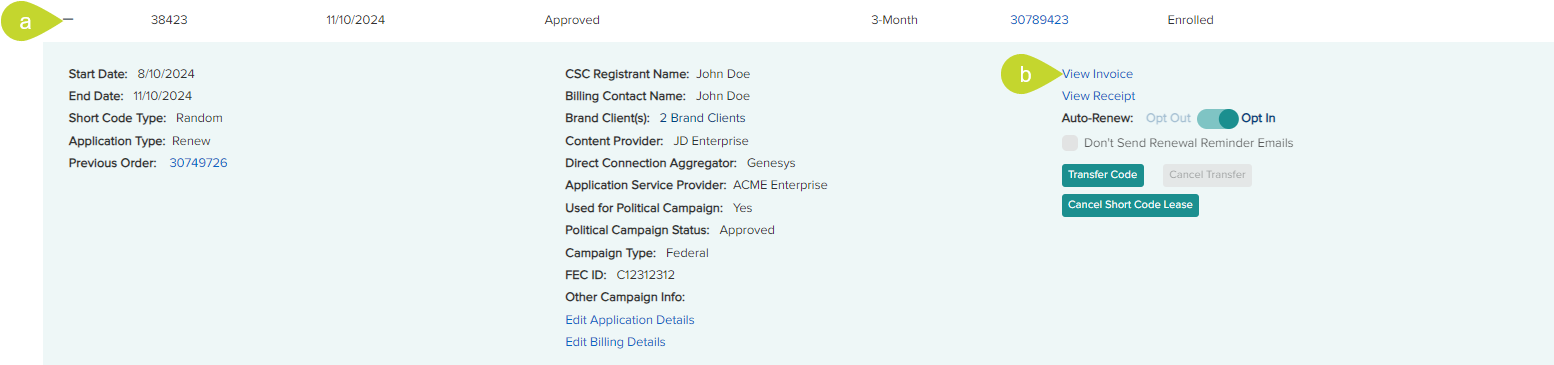
View Invoice/ReceiptView Invoice/Receipt
- From the Short Code List tab, expand the short code by clicking the + icon for the short code for which you wish to view the invoice or receipt.
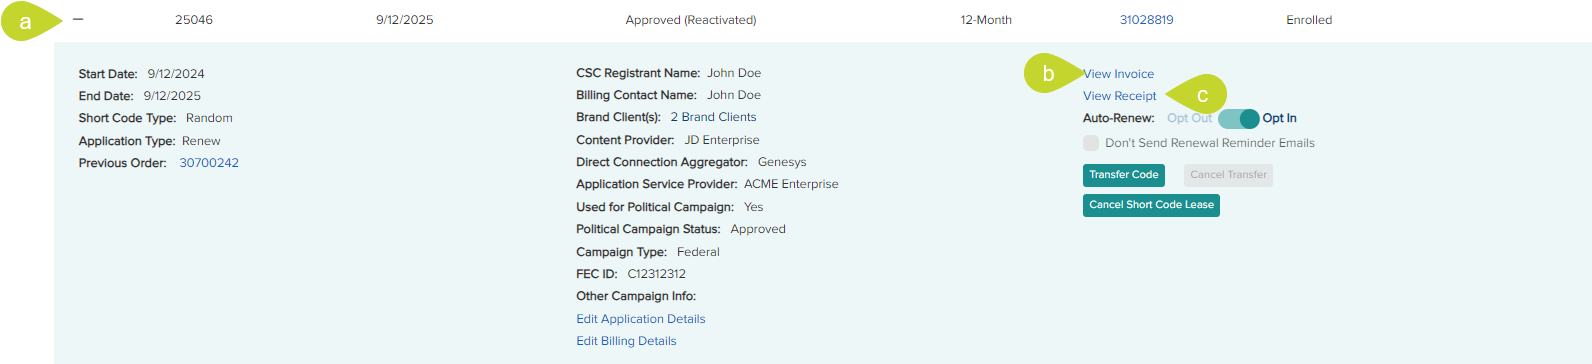
- Click the View Invoice link to open the invoice of the selected code in a new tab.
Note: The Update Purchase Order section is only displayed in the invoice if there is a Purchase Order number associated with the order. If you have entered a Purchase Order Number when ordering or renewing the code, you may edit it on the Invoice tab. For orders with purchase order number, under the Update Purchase Order (Optional) section, edit the Purchase Order Number and click Apply to update it or click Remove to remove it.
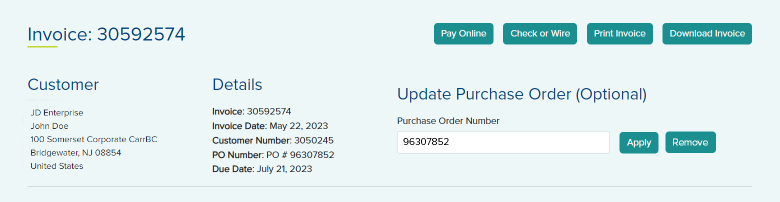
- Click the View Receipt link to open the receipt of the selected code in a new tab.
View Monthly InvoiceView Monthly Invoice
- From the
Short Code List tab, expand the short code by clicking the + icon for the short code for which you wish to view.
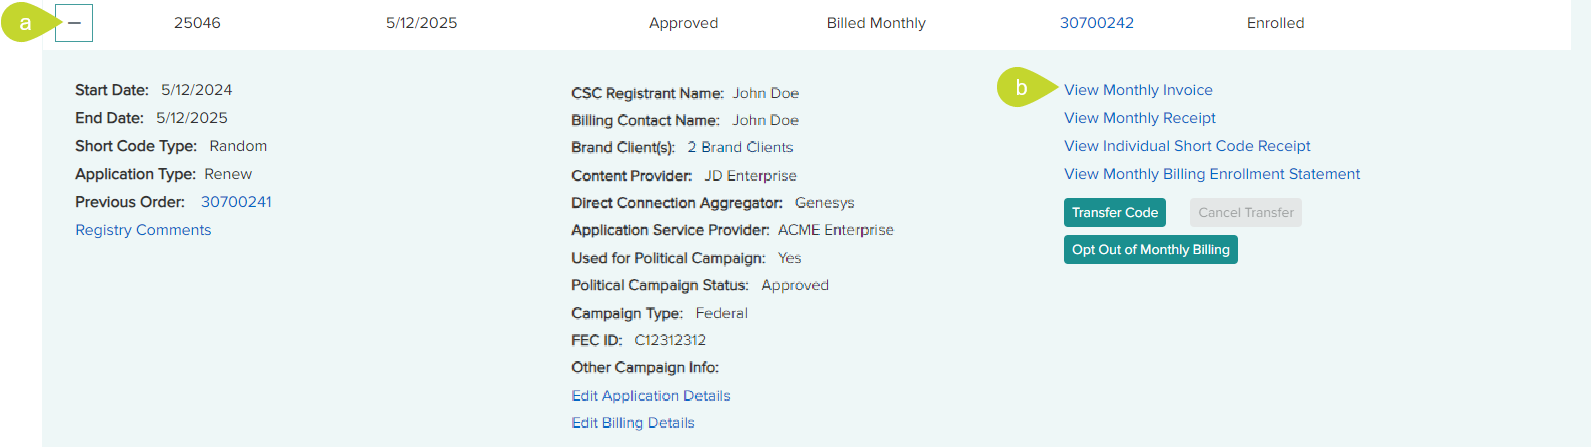
- Click the View Monthly Invoice link.
- This opens the invoice in a new tab.
- From this invoice you can do the following by clicking the respective buttons on top of the invoice:
- Pay Online takes you to the Payment page where you can pay using your credit card/ACH
- Check or Wire takes you to the instructions
- Print Invoice prints the invoice
- Download PDF downloads the monthly invoice as PDF to your computer
View Monthly Billing Enrollment StatementView Monthly Billing Enrollment Statement
This link is only applicable to the short codes that are billed monthly.
- From the Short Code List tab, expand the short code by clicking the + icon for the short code for which you wish to view.
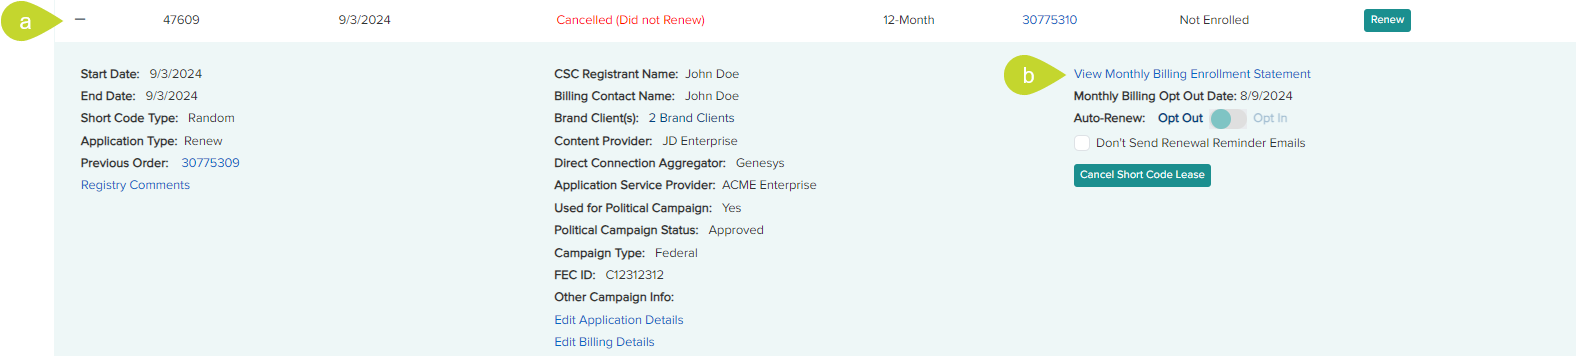
- Click the View Monthly Billing Enrollment Statement link.
- This opens the statement in a new tab.
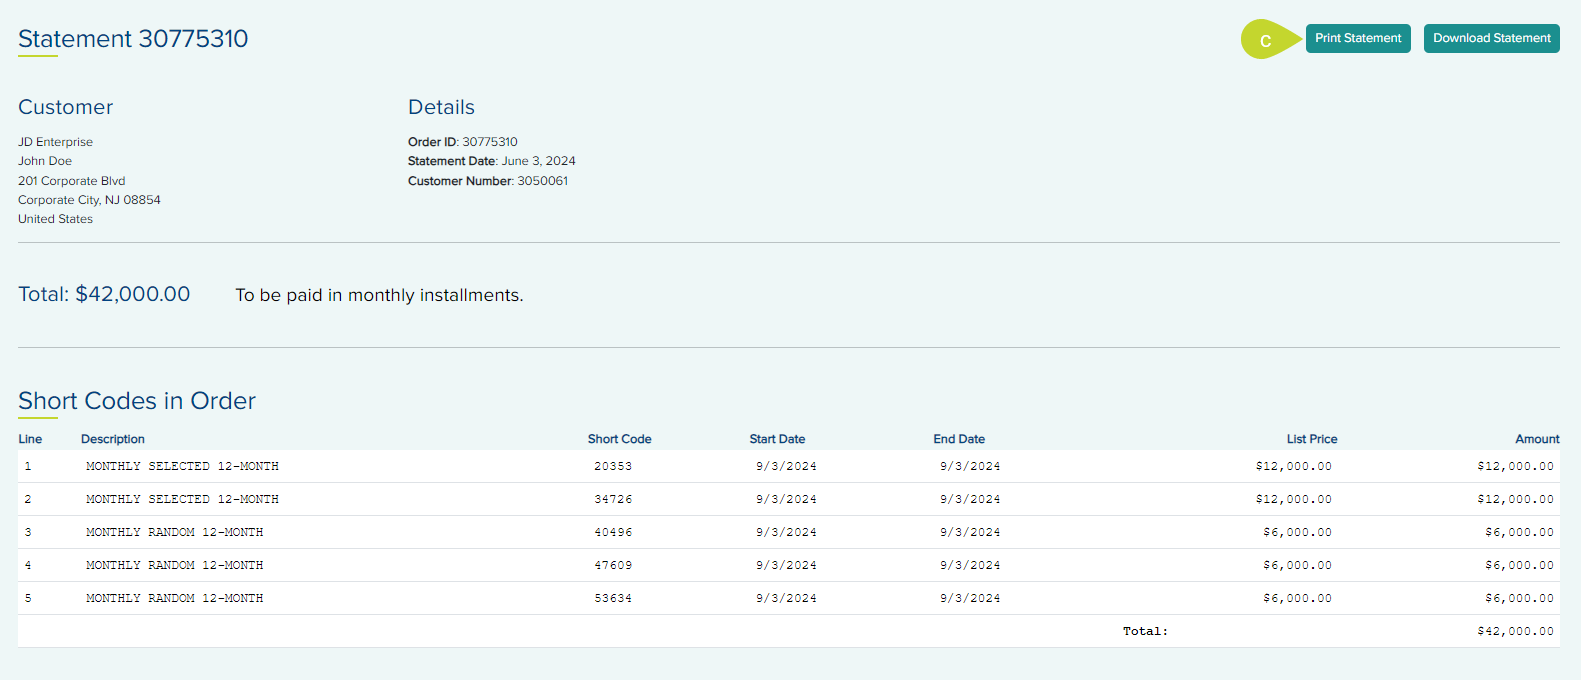
- From the statement screen, you can Print Statement or Download Statement of the Monthly Billing Enrollment Statement by clicking the corresponding buttons on top of the screen.
View/Pay InvoiceView/Pay Invoice
You can pay for a short code that is pending renewal and not enrolled in auto renewal.
- Click the
View/Pay Invoice button below the
Action column for the code.

- On the Invoice tab, click
Pay Online to pay for the code.
Note: You may pay for the code using the credits in your account, if any, by selecting the Apply Credit on Account check box under the Payment Information section. If you have enough credit to cover the full amount of the invoice, the Amount Due becomes $0.00. If the credit covers less then the full amount, the Amount Due reflects the remainder. Select a credit card/ACH to pay the remainder.
View Previous OrderView Previous Order
You can view the previous order details of a short code that is renewed after expiration.
- From the
Short Code List tab, expand the short code by clicking the + icon for the short code for which you wish to view the previous order.

- Click the Order ID link for
Previous Order. This opens the
View Orders tab under
Billing.
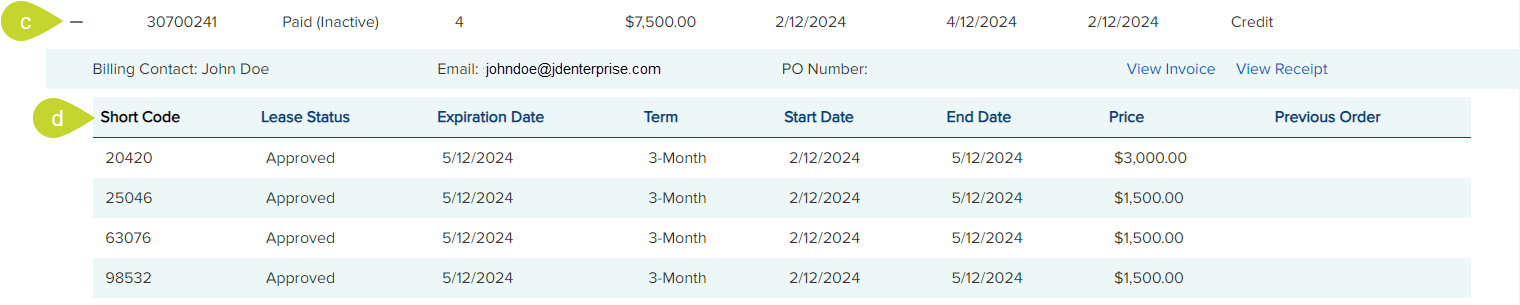
- Expand the order details by clicking the + icon for the order.
- You can view the details like Short Code, Lease Status, Expiration Date, Term, Start Date, End Sate, Price, and Previous Order number if any.
View Registry CommentsView Registry Comments
- From the
Short Code List tab, expand the short code by clicking the + icon for the short code for which you wish to view the Registry comments.
- Click the
View Registry Comments link.

- Click OK to close the dialog.